
i’ve been away from my usual life for a couple of days to get some medical treatment i’ve been waiting for and all the time traveling to and from the hospital and lying there unable to do anything – really anything (it was vision-related and my eyes simply didn’t work well enough to see a screen for many hours at a time) – i kept coming back to the same question. how do i build a workbench?
well, the first thing you need to do is separate the idea of “my workbench” from “my first workbench”. and this is a hugely-important step. everything you make can be better. everything everyone makes can be better. but the difference between the first time you make something and the second is usually where the huge leap in design and build quality happens. a workbench is probably the best example of this. before you have a real workbench, you have an idea of what you want it to be. you have theories. but you don’t have the experience of “i like this” or “this drives me crazy”.
for example, i spent a long time thinking of how wonderful it would be to have a shelf of two under the bench to keep stuff on. i thought it was going to be awesome to have places to put stock when it was being worked on but off the surface. or lay tools. anyway, i did it. i followed that advice – which is, by the way, extremely-common. and it was a disaster. the shavings from the bench fall through the dog-holes and more and more stuff accumulates under the bench. now i refuse to deal with shelves under a bench. either drawers/cabinets that are fully-enclosed – i prefer drawers and you’ll see a much-more-advanced bench design soon here in my more-comprehensive series on workbench-building and history that includes many of them – or a simple structure that is open and easy to clean around. i know people say the shelf gives the bench extra rigidity and strength. if you’re talking about a timberframe bench, you’ve got lots of that already. if you need the shelf to give you torsional anti-racking, you’ve fucked up your design at a much earlier point. you can build shelves if you want. but i suspect you’ll just be giving yourself a place to collect stuff that should be put away and kept clean – and all that dust on your tools attracts moisture and encourages rust. if nobody ever told you this before, clean your shop. now. cause the dustier your tools are the faster they’re rusting.
the second thing is to think about what a workbench is for. i’m assuming you work with handtools. not necessarily exclusively but you work with rough lumber and you do at least some handtool work and want a bench to do that on. you might also want a bench to route or do other powertool things on and that much the same thing. and you want an assembly-table so it’s best to have a workbench that doubles as that, too – i want a bigger shop and you probably do, too. if my shop was five-hundred-square-meters, i’d still want a bigger shop. almost never have i thought “i really want a bigger house” or “i want a bigger apartment” but i’ve constantly thought “a bigger shop would be awesome!” and i don’t think that ever goes away. it’s nice to have a table that works for everything. if you’re a commercial cabinetmaker and do most of your work on large machines from sheet goods, this might not be the bench for you. but you’re not a beginner and this isn’t the bench for you, anyway.
the third thing is cost. you want your first workbench to be relatively cheap. not cheap to the point it’s a shit bench. cause that’s not going to help anyone – and it’s not going to save you any money. you’ll just have to build another one and you’ll probably ruin a lot of expensive wood before you get around to building it. it’s one of those cost-benefit things. buy a mostly-worn-out used car and you’ll probably regret it. buy a moderately-old honda and it’ll usually be a very sensible purchase. buy a brand-new bmw and you might be happy with it but wow the money. for your first bench, even if you’re eventually going to buy the bmw eventually (ok, given the choice i’d seriously just buy a nice toyota and leave the europeans to their meaningless luxury – as you know, i’m anti-luxury in every possible way), i suggest starting with this bench, the ten-year-old, well-maintaned civic.
not quite a fourth thing but something to keep in mind. workbenches have been used for serious woodworking in much the same way for about as long as the teachings of the buddha have been around – two-and-a-half millennia. in all those years, we’ve learned a few things. when you’re designing and building furniture, innovate. be creative. go out on limbs and see if they fall off or sprout new life and spring into beautiful flowers. when building a workbench, do something that’s at least firmly-grounded in how things have been done. no, don’t do it just because it’s traditional – give up the old-school leg-vise and notch workholding and get yourself a modern twin-screw or at least cast-iron face/end-vise. and planing stops are just a cohesive recipe for bad technique and sloppy work. but they knew how to build a solid bench in pre-revolutionary france and tang-dynasty china. let’s not try to reinvent the wheel. they’ve done this already.
what they didn’t have was cheap dimensional lumber. and that is where this design comes in. and i’m going to take a little departure from my usual metric-only approach to talking about dimension. but with a caveat. the plans and design are metric. i’m going to give imperial measurements for your benefit as long as you understand they’re all approximate. i’m not going to say “approximate” every time – it will quickly get repetitive and annoying. but they are. 6mm is not exactly a quarter-inch and a foot is not exactly 300mm. but it’s close. if you’re going to build this, use a metric ruler or draw the whole thing out for yourself and do the calculations with fractions and such. it won’t work out quite the same but it’ll be a perfectly-fine result. if you try to build this based on the imperial estimates, though, you’ll end up with a bunch of things that don’t quite fit together. you’ve been warned.
so what are we planning to build? this.
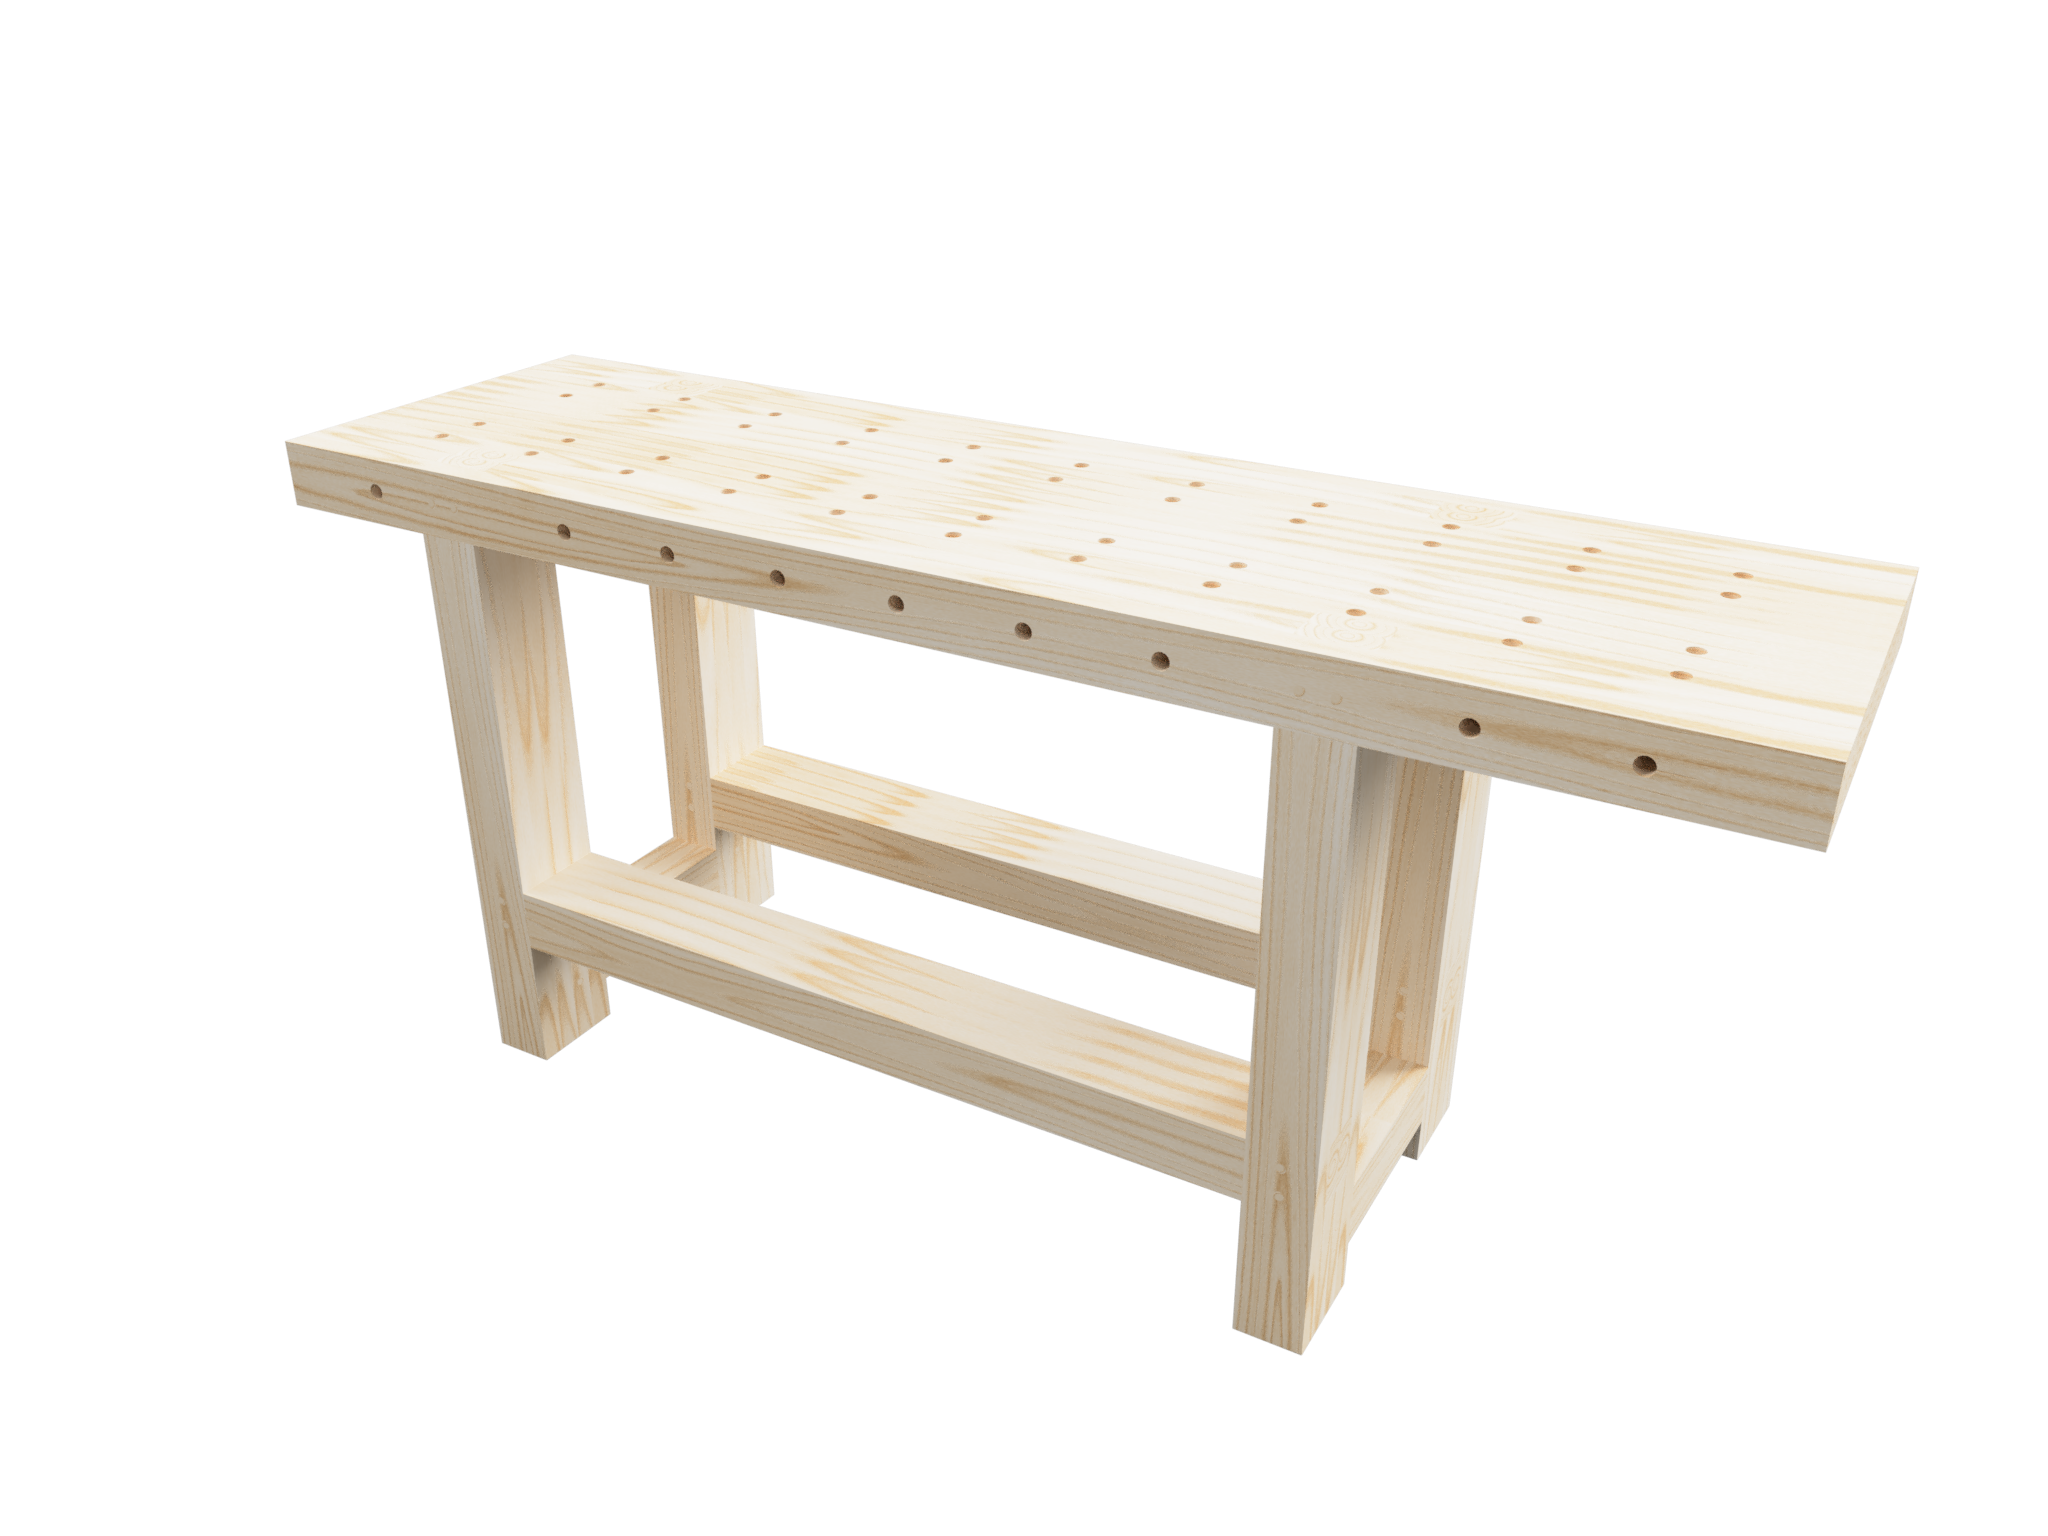
the first thing you’re going to notice is what it’s made from. and this is something i tend never to do. it’s made from dimensional (framing) lumber. there are many things you can build a workbench from and i think the best thing you can use is a heavy, strong hardwood like hard-maple or a local species at least that hard. but when you’re building your first bench, there’s no reason to spend all that money when you can actually get by with something far, far cheaper. you might keep this bench a year or two until you have a really-solid idea of what you want to do. it will give you the ability to do all the things you need for now and, if you buy a nice twin-screw vise, you can always take that off and put it on a nice new hard-maple bench later so it’s not a wasted investment. when you’re finished with it, you won’t feel like it was a thousand dollars in lumber and you’ll probably give it to another beginner woodworker who needs a bench and wish them well.
this whole bench comes from a basic restriction many of my students face. they can get loads of 50x100s (2x4s). and that’s what they can afford and easily transport and work with. so they often start by making projects only from that. in your part of the world, it might be southern-yellow-pine. it might be douglas-fir. it might be redwood. whatever it is, that’s ok. this is rendered in something that looks vaguely like pine in the mockups i’m sharing with you but that’s no indication of one species being better than another. whatever you can get is totally ok. you’re going to be putting enough sheer thickness and density into this thing really any species will do. i’d avoid anything that doesn’t have a species listed – “whitewood” is more like working with a bar of soap than something the consistency of wood. but whatever you’d be comfortable building a wall with will work just fine for a basic bench.
so we’re talking about an all-2×4 bench. how many? well, that actually depends on you. because we’re all humans and we’re all different sizes so your workbench should be the right height for you. i’m not very tall. my bench is a little over 900mm tall, which most people say is far too tall for me. if you’re 190cm, though, that might be too short. if you’re 150cm, you might want a bench that’s dramatically shorter. which means shorter legs. less lumber. but a good approximation is that the benchtop (if you make it the size i’m talking about) will take eight 50x100x3050mm (2×4″x10′) boards. the legs will take about five more. the short stretchers will take another one and the long stretchers will take another four. so that’s eighteen of these boards. depending on how you cut it and the dimensions you actually pick for your bench (i encourage you to customize it to your needs and space – this is only a basic guideline, not final dimensions), you might need a few more or less than this. but this is all the lumber you’ll need. if you build this actual bench the same as i’ve detailed it here, you’ll end up spending far less than buying high-quality hardwood. but you should do your own research. the day i’m writing this, a 2x4x10 at lowe’s costs about $6.50 so 18 of them works out to be just over a hundred bucks – not bad for an entire bench worth of lumber.
what else do you need to build this thing? in terms of building materials, you’ll need glue. you will hear a lot about glue. if you’re a beginner, i suggest you ignore most of it. there are two basic glues useful for woodworking – pva (often just called “wood-glue” or “yellow-glue”) and structural-epoxy (like west system or totalboat, which you’ve certainly seen and heard a lot about if you frequent the youtube woodworking community). yes, things like ca and quick epoxy can be useful for very specific, temporary tasks. but these are the two modern general-application glues. when do you use pva? well, all the time. use epoxy when you have to do something that requires a lot of gap-filling, huge open-times and solid hold beyond what a basic glue can manage. it’s expensive and smells awful. regular wood-glue is cheap and works really well. there are other types of glue out there. don’t use them. hide glue, while being incredibly unethical (they literally grind up parts of dead animals to make it) is simply not nearly as effective, much messier and not as strong, especially if your environment will ever get hot or damp – it will get hot and damp, i suspect. urethane glue works fine but it’s far more expensive and the mess when using it is … not pleasant, to say the least. even if it wasn’t messy, though, it would be many times the cost of pva so it’s a bit of a moot point. use pva. for this project, using structural-epoxy would be like putting thousand-dollar hubcaps on your old honda.
in terms of tools, there are two ways you can go about this – the handtool way or the hybrid way. either way, you’re going to need three planes (a fore, a jointer and a smoother), a saw (a carcass saw or a kataba will work well for this and you really only need one saw for the whole project) and a chisel (i suggest a 32mm chisel because it’s efficient). yes. you’re going to have to chop four mortises. i’ve designed this to minimize mortising but there are four that are unavoidable. yes, you can decide to do this whole thing and leave out the mortise-and-tenon joints but they’re really not hard to make and even if they’re sloppy it doesn’t matter cause they’re just on the bottom short stretchers and nobody’s ever going to see them. none of the joints that are particularly visible require any mortise-chopping and this whole thing is meant to be as beginner-friendly as possible. you can attach the short stretchers another way – butt-joints and dowels. they’ll give the bench some strength but nowhere near as much. and no, even if you screw them in, you’re still not getting the anti-racking advantage a tenon-shoulder gives it. it’s up to you – it’s your bench. but my strong recommendation is make the mortises. they’re hidden and big so inaccuracy won’t really matter and the outside-edges of the mortise will simply not show in the finished product, anyway. this is a good place to cut your first ones, if you’ve never tried this joint.
here’s the cautionary tale. if you’re buying a couple of dozen long boards of cheap lumber, that’s not going to be a pleasant milling task by hand. it will take days, maybe weeks, to get that wood ready to build this project. if you have a benchtop planer, you can have the stock ready in a matter of under an hour. if you’re committed to handtool-only woodworking, i’ll tell you how you can do this with just your planes. but for the sake of a single tool – no, i’m not telling you to get a whole machine-filled shop, just one machine – this might be something to think about. stock-preparation is the most time-consuming thing you can do by hand. if i was a handtool-dominant woodworker, which i’m not, i’d still have a planer stuck out in my garage to do this milling-work. there’s nothing in this project you’ll be desperately wishing you had a bandsaw or tablesaw for. it’s all pretty simple joinery to do with a handsaw. and it’s a workbench so you’re not aiming for absolute-precision and there’s no tiny joinery to cut. but a planer will make your life much easier. if you quickly hop on craigslist or go to your home-center, you can pick one of these up cheaply for under $400. is a couple of weeks of your time on this project and untold hours on future ones worth it? i’ll leave that up to you. you can get a nice one if you like. but i highly-recommend getting at least a ryobi or dewalt basic lunchbox benchtop planer and saving yourself the headache.
that being said, you can definitely do the whole thing with just handplanes. if this is what you want, the first thing you’ll need to do is prepare all the stock. it doesn’t have to be all the same thickness but that’ll make it easier. i’m assuming you can get a nominal yield of 32x82mm from your 50x100mm boards. you might get more than that. if you get more, your bench will be slightly larger. if you only get 30x80mm, your bench will be slightly smaller. remember these are only rough guidelines. you need to take your own measurements. mine are all based on 32x82mm from each board. the length of the boards is irrelevant cause you’re cutting those to length, anyway. the important part is to get them flat and smooth and remove any factory curved edges. you want a rectangular prism that’s made of four ninety-degree angles, nothing more or less. “square stock”, we can call it. or “surfaced-four-sides”. i recommend getting this as smooth and flat as possible before starting. you’re going to have to do it eventually and it’s easier when it’s not glued or joined together. if you’re doing it with handplanes, start by getting the pieces approximately flat and level with a foreplane, joint them with the jointer then smooth them with a smoother. i’ve explained how to do this in many places and there are literally hundreds of videos on youtube showing how to square a piece of stock. if you’re committed to just using planes, you probably already know how to do this, anyway. if you’re using a planer, run all the stock through on both sides and both edges to get to final dimension. like i said, you’re aiming for about 32x82mm so if you get there you’re doing well.
beyond the basic tools, you’re going to need some clamps. how many you need depends on what you have and how much of this you want to do at a time. i suggest pipe-clamps if you don’t have any. f-style and quick-release clamps aren’t going to be strong enough and bar-clamps (parallel-jaw clamps) are very expensive and not necessary for this project. for gluing the benchtop, you’ll probably need at least six. i would suggest using more – at least ten. again, up to you how much pressure you feel comfortable putting into the thing. but i suspect you’ll find more clamps is better than fewer clamps. i’m going to suggest you do all this gluing in sections. there are a few reasons for this but it really comes down to simplicity. you can glue the entire bottom structure together all-at-once. but that’s a huge nightmare and this much wood is heavy to move around. it’s easy to make mistakes and that’s not an easy thing to fix in the moment with adhesives drying around you. the same with the benchtop. you can put it together as a single glueup. unless you’re looking for problems, i’d say that’s a bad idea. if you’re going to try to do multiple glueups at the same time, which you probably will, you’ll need more clamps. you can never have too many. a few dozen is a basic minimum for most woodworkers and i am certain a couple of hundred would never feel like enough. you’ll also need a big square. i suggest a speed-square or a framing-square. to check for square when you make your parts. it doesn’t have to be expensive (read starrett) – just pick one up at your local hardware store and it’ll be just fine. you need one that can check both inside and outside angles. the ones with triangles in the middle aren’t sufficient but one that’s shaped like a big l will work regardless of brand or material. we’re not aiming for surgical precision here, just close-enough-for-a-bench. you’ll actually level and smooth everything from time to time as you work, anyway, and the thing will naturally skew and get damaged. it’s a tool. this isn’t a fine piece of furniture.
so let’s begin with the benchtop. this benchtop is totally customizable to whatever length and width you want. but i think this is a reasonable size for most people, especially beginners. you’ll find people who say you should have a deeper or longer bench and, if that’s what you want, go for it. you can stretch this out to 2400 or even 3600mm and the whole thing will still work for you without any issues. if you’re going to make a 3600mm bench, though, i’d say you may want to add some legs supporting the middle. just saying. or think about making two 1800mm benches and putting them end-to-end cause moving a 3600mm bench will be a nightmare and i promise you’ll have to move it eventually. the benchtop in these plans is 512mm (20″) wide, 1800mm (5’11”) long and 82mm (3.25″) thick. you won’t get more thickness unless you use larger lumber, which you’re welcome to do. you can make it wider by adding more laminations or longer by simply cutting the boards longer.
we’re going to make this by laminating multiple pieces together. this style of benchtop was popular in europe and is the one people often think of as “roubo-style” for a benchtop. practically-speaking, roubo was actually describing a massive slab-top bench that was already common at his time but it’s an excellent, traditional approach to a stable work-surface and we’re going to liberally copy it. in roubo’s design, the whole thing is held together with sliding-dovetails and mortises cut in the slab. we’re going to make the joinery dramatically simpler – through-mortise-and-tenon joints without having to actually cut any holes in the benchtop. we’ll do that by leaving gaps when we laminate. to do this, you’re going to need to prepare a few spacers. the spacers should be off-cuts from your standard stock at least 82mm long (i’d say aim for at least 100mm just to avoid any problems). what you need to do with these is glue two pieces together (face-to-face) and clamp them. you’ll end up with blocks that are about 64x82x100mm and the important part is that the 64x82mm part is exactly the size of two of your bench component pieces stacked face-to-face. when you have four of those glued together and dry, wrap them in packing-tape. you’re going to use those as spacers when you glue the benchtop together and you don’t want them getting stuck in place. with that done, we can make the benchtop.
i’m going to talk about “pieces” throughout. these are all the same – 32x82x… some length. assume all the components are cut from standardized stock you’ve already prepared.
to do this, you need 12 pieces cut at 1800mm, 8 at a little over 400mm (they’ll be trimmed to size later) and 4 at 1016mm. we’re going to glue this together in four pieces then glue the four pieces together to make the benchtop.
the first two are really simple. laminate 4 of the 12 long boards face-to-face and clamp them. you want the clamps to alternate between the top and bottom of the boards, pressing the glue-joint together the entire length of the joint, evenly-spaced. aim for at least one clamp every 200mm, either top or bottom. that means probably no fewer than six or seven clamps, preferably nine or ten for each glueup. you can do one at a time or both of these. try to keep them as flat and level as possible. it will save you time smoothing them after it’s all glued.
the other two are identical but not the same as the first two. the outside boards in each are long but you’ll stack the interior boards with the spacers. each edge will have a 400mm section, a spacer, a 1016mm section, another spacer then the final 400mm section. you’re making a sandwich and both should look the same. if your pieces are exactly 400mm, they should be flush with the ends of the sandwich boards (1800mm) but this is hard to accomplish so i would cut them at least 10-20mm too long and trim them after the glue dries so they’re flush – it’s easier to be accurate in hindsight than foresight.
these should be clamped the same way. you can build all four of these benchtop assemblies at once and let them dry or you can do one at a time. it really depends on how much space you have and how many clamps you’ve acquired. if you don’t have enough clamps, ask your friends. woodworkers often have more than you might think and are usually pretty generous about lending them if you just need them for one big job – you won’t know if you don’t ask.
when those are done, here’s a quick tip if you have a planer. take each newly-glued-up assembly and use the planer to make sure they’re all completely level before moving on. it will save you loads of time flattening with a plane after the next step. the full top won’t fit through the planer but each of these pieces will. if you’re doing this whole thing with only handtools, don’t bother to smooth and flatten at this point. just make sure the outside edges have no glue on them (if there is, use a chisel to scrape it off) and move on.
the next glue procedure is laminating these four pieces into a sixteen-piece benchtop. it’s the same as what you just did with four pieces of long stock. they’re just a lot thicker now and will require more clamping pressure. you’ve had four practice runs with easier boards already, though, so you should be able to get it all glued tightly together, face-to-face. again, try to keep them as even as possible. you might want more than just 8-10 clamps to get this to stick together. i think i used 24 clamps. it’s up to you. but if you don’t get enough clamping pressure the glue joint won’t be as strong. you’re going to be pounding on this bench for years. i’d suggest making sure the pressure is sufficient.
with that done, you’re about half-finished the whole project and you can congratulate yourself. this is actually the most cumbersome and heavy part done. the rest is quite a bit easier to work with because the laminations are smaller. by the way, all the diagrams and measurements are in the pictures at the end of the article if you’re wondering why you haven’t seen them yet. i recommend reading the whole procedure first before you even think about making it yourself. you can skip to the pictures but i think they’ll make more sense when you hear the process.
most builds like this glue the two ends together before gluing the long stretchers. that often makes sense. in this case, we’re going to do the long stretchers first because those are easier and it will be far simpler to get them together, assembling the short ones in the spaces we’ve left.
before we get into that part, though, we’re going to prepare the benchtop.
i assume you have some sawhorses. stick it up on some, face-up. if you don’t have sawhorses, you can definitely do this step on the floor. it just won’t be as comfy and you should probably get some sawhorses anyway. up to you.
use a chisel to scrape off any big bits of glue that’s squeezed out. don’t worry. it won’t damage your chisel. now treat the whole thing as a single board. first, knock out the spacers – this is why you wrapped them in packing-tape. they should be easy to slide out with the help of a hammer – be somewhat gentle. you don’t want to damage the benchtop at this point. it should be quite stable even without the leg structures attached, though. it’s sixteen pieces of wood glued together with a few holes in the middle so we’re not talking about a cheap desktop here. it’s big and solid. with those knocked out, make sure the insides of those holes are clean without any glue. you can again use your chisel to make sure they’re smooth and flat. with that done, turn your attention to the bottom of the benchtop. joint and smooth it with your planes. you probably won’t need the fore. it should already be relatively level. flip it over and do the top – why start with the bottom? if the thing is sitting on your floor or sawhorses, the side facing down will probably get scratched. might as well smooth the top of the bench last so it’s got less visible damage from the process. assuming you have it raised off the ground, you should be able to joint and smooth all four sides of the benchtop at this point, too. you can do this either now or at the end. i would do it at the end. if you want to do it now, flush-cut the four pieces sticking out (assuming they were >400mm) and joint and smooth the edges the same as you did the bottom and top.
you’re going to need four spacers again. you can use the same four as long as they’re still stable and clean. i recommend making four new ones, though. they’re exactly the same. don’t forget the packing-tape coating – you’ve already seen why and you can imagine what those would have been like to get out without it.
these assemblies are actually a little more strange-looking than the benchtop was because we’re making tenons without cutting anything. all four are identical.
the outside pieces in the sandwich are 738mm. the inside pieces start from the floor with a 180mm piece, a spacer then a >558mm piece. this will give you a bench-height of 820mm (about 32.25″) so you should adjust this to your desired height. add or remove height from the bottom of all four pieces equally. you don’t need to shift any of the other math around. the spacing of the holes doesn’t change. all the other measurements from the floor, though, assume this is the leg-length so remember to add or subtract from those measurements whatever you change about these ones. when i saw >558mm, i mean cut it a little long so we can trim it later. it should, if everything is good, end up at exactly 558mm. but i’d cut it more like 580mm and assume things will all get cleaned up at the end.
glue these together the same as the benchtop components. unlike the benchtop, though, these are finished after a single glueup. get rid of any squeezeout and joint and smooth them after knocking out the spacers – this is the last piece of the build where spacers are used so they’ve now done their job admirably.
let’s move on to the long stretchers. these are an inverted-sandwich with the middle wider than the outside. the long pieces are >1180mm and the short ones on the outsides are 1016mm (remember, 1180 is the target length and you can go closer to 1220 and trim them back for safety if you like). you’re aiming for the same extra on both ends of the longer boards – 82mm on all sides – if this measurement sounds familiar, it should – it’s the thickness of the benchtop and the legs, our nominal-yield from our original boards. when they’re dry, joint and smooth them.
now we’ll do the short stretchers. these are really simple. you need two outside pieces for each and a center piece. the center piece is 448mm and the outside ones are 256mm. make a sandwich with the middle sticking out equally on both sides – it should be 96mm. clamp this together and let it dry. then do the same with it as you did for the other stretchers with your jointer and smoother.
the next piece is the part you’ve probably been worrying about. but it’s not hard at all – cutting a mortise. you’ve already got the tenons. they’re the inverted-sandwich pieces of the short stretchers. now get your pencil and mark out the place where the mortise will go on the insides of the four legs. if you’re using my leg lengths, this will be 60mm from the ground. if you’ve changed the length of the legs, don’t forget to shift this the same amount. if you want to make a really short bench, you can move these short stretchers so they’re above the long ones and the strength will be the same. i think they look better on the bottom. you can put them at the same height but that makes the joinery much more complex and doesn’t add any rigidity.
the mortise should be 82mm tall and 32mm wide with 25mm from each side to the edge of the leg. this is why we talked about using a 32mm chisel. this mortise doesn’t have to be clean or accurate. but it has to be big enough and deep enough to hold the tenon. it’s going to be hidden by the short stretcher except its top and bottom lines – the sides will disappear and, of course, the bottom will be completely invisible inside the leg. take your chisel and hold it across the grain of the wood, start from the center and pound in at 45-degrees. then turn the chisel 180-degrees and pound in at 45-degrees to create a v. the middle piece should come out. move the chisel a few millimeters away from the center and do the same, rotate 180-degrees and complete the bigger v. keep repeating this process and moving out in the direction of the short walls of the mortise. the width should remain the width of your chisel. as you get closer and closer to the short walls, your chisel will become more and more perpendicular to the face of the board. by the time you get to the walls, you’ve chopped a mortise. periodically check the depth by holding the chisel in the mortise at its lowest point – you’re aiming for 96mm. a few millimeters too shallow is going to be a problem but a few too deep is no issue at all so better 100 than 92. your tenon has to fully fit in the hole. when you get it approximately there, use your chisel to scrape the sides and bottom to finish it then do the other three. see? mortises aren’t anything to be worried about. precision will come with practice but this is a brute-force mortise and shouldn’t take very long.
you now have all the components ready to be assembled but it’s still best to do this in stages. before even thinking about gluing, put the whole thing together. make sure everything fits. you don’t want any surprises. if anything is tight, use your chisel or rough sandpaper to make sure things slide together easily. if you’ve measured everything, it should all work.
i recommend gluing the short-stretchers to the legs first. then glue the assembled short-stretcher-leg assemblies to the long-stretchers. then glue the complete bottom to the complete top. yes, the ends of the tenons from the long-stretchers and the legs will poke through. you’ll need to flush those with a saw.
when you get the short-stretchers glued together, you’ll discover the sides stick out quite a bit. you have a choice here. you can use your planes to smooth them so they’re flush or you can simply ignore it. either way is fine. i would flush them because it looks better but it’s a bench – a tool – and it’ll work completely the same whichever you choose. if you’re not sure it’s worth the effort, you can always leave it and flush it later if it annoys you. i’m pretty obsessive about details so i know i’d have to do it and it’s easier to get it out of the way now. it shouldn’t take more than a few minutes with fore, jointer and smoother to get the surfaces all nice and flush if that’s what you’re looking for. the overhang is about 7mm (9/32″) on each side, by the way. so it’s not a lot of material to remove.
with that done, get out your smoother again and finish all the surfaces.
now comes the time to make sure everything stays together as solidly as possible. this is not a required step but i think it adds a lot of future-proofing to it because glue can always weaken over time but holes are forever. these are drilled in precise places in the diagram but close enough is fine. they’ll look much better if they’re precise but they’ll work just fine if they’re a few millimeters in any direction. the whole thing is strengthened using 12mm (.5″) dowels. drill the holes (brace-and-bit and auger or powerdrill and forstner or spade-bit – completely up to you as long as you get 12mm holes). these dowels can be homemade or bought. remember if you get commercial dowels they might not be exactly 12mm and the measurements will need to be modified. drill them all as showed in the diagrams, pound in the dowels, flush them with your saw and use your smoother to trim them so they don’t stick out.
the final detail, also optional, is something i find very helpful – holes for round bench-dogs. these work as stops and braces against your vises. they keep work from moving and allow so much flexibility of workholding i think they’re invaluable. that being said, you can always drill as many or as few as you like. i find having them about every 150-200mm in four rows has been my preferred layout. i also like having them on the front surface of my bench so i can prop up a piece without having to use any external support if i’m holding it to plane the edge in the vise and it’s longer than the vise can normally support. they’re very flexible and – this is the best part – they’re free because they’re just holes. you can make some bench-dogs from scrap or buy commercial ones. you can even skip having a vise altogether and get a dog-hole surface clamp – veritas, for example, makes several excellent dog-mounted clamping solutions that would work really well. i use 20mm dogs so i use 20mm holes. size your dog-holes to fit your desired dogs. drill them in the middle of your laminations to avoid splitting the wood. when you drill them, go almost all-the-way-through and, when the bit pokes out the bottom, drill the last bit from the bottom. this way, you’ll avoid extra blowout on the bottom of the bench. if you get it, that’s ok. it’s the bottom of your workbench and nobody’s going to be looking. but it’s nice to know you were careful, right?
as far as vises go, my recommendation is to get one vise for the face and one for the end. i use the same one for both – the veritas twin-screw. but that’s a very expensive vise and you may not want to spend that much money. there’s definitely another option, though. i’ve seen them as cheaply as $30-40 on ebay and at home-centers made from cast-iron and they’re usually just called “woodworking vises”. they’re simple and you can add two wooden jaws to protect your work. i recommend getting one with a dog-hole so you can use it in combination with your dog-holes on the bench.
i guess the only thing left to do is finish the bench. some people leave their benches unfinished. i think that’s unwise – the finish isn’t for show. it’s to protect the bench and you don’t want it to start degrading on you. we’re not talking about a film-finish. all the work would destroy that, anyway. you can use your preferred finish but my recommendation is to use a few coats of shellac. wipe it on, let it dry, wipe on another coat. you’ll have it dry and ready for use in a matter of a few hours and it will definitely make the wood look richer and the whole project look more complete.
this is the first in a whole series of bench designs and build instructions but i figured it would be far better to start with something beginner-friendly, simple and cheap to make. this whole thing can be made for a little over a hundred dollars worth of wood (in most of the united states and canada) plus some glue, effort and basic tools. if you have a little planer, it’s a project that can be knocked-together in a matter of hours (plus gluing time). otherwise it might take a few weeks but it should be a fun and relatively-simple build. if you feel up to building a bench, good luck! if you have any questions or want to check anything before you start, please get in touch. i’m always happy to help if i can. thanks for reading!