japanese saws (nokogiri, 鋸) have, for the last few decades, been becoming more and more popular in the west as an alternative to inaccurate, rough push-stroke cutting tools that have been the norm for centuries, requiring thicker steel, more force and causing untold mechanical injury to craftspeople. it is unsurprising that they have been so effective in penetrating the lucrative hobbyist woodworking market in such a short period of time. this saturation of the industry, however, has come at an unpredictable cost — there is vast supply of the tools but, as a result of the shift in japan away from handtool woodworking in production shops, very little english-language instruction on how best to use them. the result has been that woodworkers in the west have embraced the tools but simply put them into daily use, replacing their push-saws with pull-saws and not changing their workholding and processes to take best advantage of the tools. the same has been the case with japanese chisels (nomi, 鑿) but not so much for japanese planes (kanna, 鉋), which have had limited appeal in the west and generally come with far more knowledge of their use. while i am not a japanese-trained master this gives me a significant advantage. those on the ground in traditional workshops are out-of-touch with the situation of western woodworkers and their shop requirements and they are stuck not only in a mindset of holistic tool use in the old-style shop but unwilling to entertain anything else as they reject modernization and westernization. being a teacher embracing both the traditional norms of japanese woodworking practice and the advances of modern design and construction techniques means i can speak of the potential use of japanese tools in a western shop and hopefully provide some answers. as such, what follows is some basic instruction in the differentiation, selection and usage of japanese saws. i have written many articles on what the differences are and which to buy but i will summarize that quickly for anyone new to the topic then dive into the details of their specific use in a western woodworking environment.
background
first, though, let’s define a few terms. when i talk about a traditional japanese workshop, this may be a strange concept — especially if you’re a japanese craftsperson — because there is no such thing as a traditional japanese workshop any more than there is a single traditional western workshop that encompasses all the traditions of america, france, spain, egypt, italy and the holy lands from three thousand years ago to today. japanese woodworking really has spanned the entire history of the island nation and it hasn’t remained either static or single-path. that being said, though, there are a few things that are significantly different that distinguish the general rule of modern western woodworking from the traditional form of the japanese version as it was practiced at the time the borders with the west were opened in the late nineteenth century. these can be summarized mostly in three categories — location, workbenches and workholding.
in terms of location, much (perhaps even the vast majority) of japanese woodworking was not done in a workshop. it was done on-location. what this meant was that the tools, to a large degree, were actually built on-site and remained there. this process seems completely alien to the western woodworker but it was not at all unusual for a japanese master and their apprentices to show up with minimal tools, take over a small space either outside or in the home or business (often the same thing in nineteenth-century japan, by the way) and start from scratch, building the complex tools like marking and measuring items, workbenches, workholding, etc and, when the project was finished, those tools remained there and this cemented the ongoing relationship between the master’s shop and the client’s family, often for generations. the tools were there — this is why, in many cases, examples of japanese tools larger than the ones transported in a small toolbox (chisels, saws) tend to be both extremely basic and unadorned. the only exception to this was generally the line-marking tool (sumitsubo, 墨壺), which could become extremely elaborate but was more ceremonial, especially as it was replaced by western-style pens and later pencils for most craftspeople. there is a whole culture that has grown up around the notion of the master and apprentices visiting the home of a local person and the exchange of respect and work but that is rather outside the discussion of saws. it’s important to keep in mind, though, that as a background the idea of having a “workshop” in the western sense is largely a modern and alien concept to much of japanese craft, woodwork in particular. this is of significance when it comes to how the saws developed over time.
from the workbench perspective, there has been a general notion in the west that all japanese masters used a low workbench on the floor and that’s the history of japanese woodworking. that is not the case. not even a little true. yes, low workbenches were often used and they are extremely common. but they are only one of the many workbench styles used in japan and this depended on the type of work, location, availability of wood and, to a large extent, the duration expected from a workshop. for example, if you are in an area with limited lumber and have to set up shop for three months in a client’s back room, how much time are you going to spend creating your workbench? better to put something together very quickly and work on the ground. but if you’re engaged on a ten-year temple project to create decorative screens, for example, and you have all the time in the world to prepare the best possible setup for yourself as an investment in your future work quality, this might be a good three or four months of your time well-spent to build a solid workbench for you and your apprentices. what western culture has mostly embraced is the “notion of difference”, accentuating what seems strange or “oriental” — sitting on the floor is such a feature of japanese culture, it has been tempting for most people not to look elsewhere for japanese woodworking history, despite it blatantly existing. the important lesson to take from this, however, is not that japanese saws work best on a low bench — this is patently untrue for many reasons. it’s that western workbenches standardized on a rather specific dimensional norm even before the time of andré jacob roubo (of l’art du menuisier fame) to talk about it – approximately two and a half meters by nearly one meter by seven-hundred-ish millimeters in height (2×6’x36” if you’re in america) but japanese workbenches were purpose-built and most masters had various small workbenches. small in this case doesn’t mean low. some were low, others as high or higher than western benches. but there was rarely need unless it was for large-scale construction to have a workbench larger than a square meter or slightly longer so a small shop could hold several rather than the one mammoth bench in western shops. it’s just important to keep in mind that western woodworkers are not trying to replicate the situation of a low-workbench environment to best use japanese saws. this is simply an ahistorical interpretation, dwelling on a single aspect of a much more diverse traditional culture.
the third of these concerns is workholding. yes, many masters learned the ancient tradition of workholding with the body while operating on parts. if you want to see this demonstrated in a good english-language text, you can certainly take a look at japanese woodworking tools by toshio odate and it is an excellent guide to this style of woodworking. the problem with his book (which is, by the way, a brilliant discussion) is that it seems to imply that this is a singular and expected tradition for all woodworking in japan. he doesn’t claim this to be true anywhere in the book and has often spoken against this notion in his public statements but it has been embraced as the entirety of japanese craft in a single volume, given that there has been little else written in the west about other forms of it. and this has led to a rather large degree of simplification and confusion in western woodworking about what japanese forms were truly like in history. what he is describing is definitely one school of thinking and practice and it is probably the oldest. it is not, however, the general rule for modern japanese craftspeople of the eighteenth and nineteenth centuries where production was far more important than those first-millennium and early-second-millennium floor-and-body-type traditions were still followed. much as some japanese artists still worked on rice paper on the floor, by that point most were painting at easels standing and most japanese woodworkers had shifted away from those ancient forms of deviceless workholding to something far closer to the western norm of clamps and vises.
it is not common to see a vise on a truly traditional japanese woodworking bench in the simplest tradition but from the eighteenth century on it was far more common to see a collection of wooden clamps (very rarely metal even for their mechanical parts) and some vises in production shops. what this meant was that work could be more easily held and work, as a result, could be completed more quickly without sacrificing accuracy. as most modern woodworkers have discovered, working with an unsecured piece can either be done quickly by ignoring small inaccuracies or slowly to achieve the same level of perfection as a fully-secured piece. in japanese woodworking culture, unlike western culture of the time, working for any goal other than absolute aesthetic perfection was shameful. while western clients accepted functionality, japanese products, much like japanese ceremonies and spiritual rituals, were not meant simply to fulfill a purpose but be art in a real sense. so modern workholding advances were welcomed wholeheartedly in most japanese workshops. this is important as i will discuss the use of saws assuming the use of modern workholding and a modern high bench situation in most cases and this is not a divergence from the historical reality, as some would immediately think. wooden clamps and vises were well-known in production workshops living side-by-side with traditional saws, chisels and planes from the seventeenth century on in japan and they were actually embraced in many high-end shops earlier than their western counterparts, especially those specializing in work for local daimyo, who had extremely high standards of expectation, often vast riches to pay for them but very little patience or acceptance of anything that was not absolutely as expected. while i’m not aware of it ever happening, as the local rulers had absolute authority, they could easily execute someone for gaps in their joinery — and there are stories, many true, of workers being killed in the streets of japanese towns in this period simply for standing in the path of a powerful person who just happened to have a sword and lacked patience. this was not a risk most craftspeople were likely to take so perfect pieces were the order of the day, regardless of their construction time, and anything to speed up this process was welcomed. there was also far more significant interaction between japanese and european/chinese cultures at this point in terms of information. the people weren’t moving around much until the late nineteenth century but art, books and culture were flowing across the border in both directions. japanese woodworking masters were well aware of what was happening in china and europe, though it is unlikely those in europe were particularly aware of the japanese traditions, as it was not encouraged that these things were written about in the way they were in europe at the time. whether japanese craftspeople got their ideas for workholding and bench design from the west (including china in this context) or they grew from native roots is anyone’s guess, though i suspect it’s the former.
types of saw
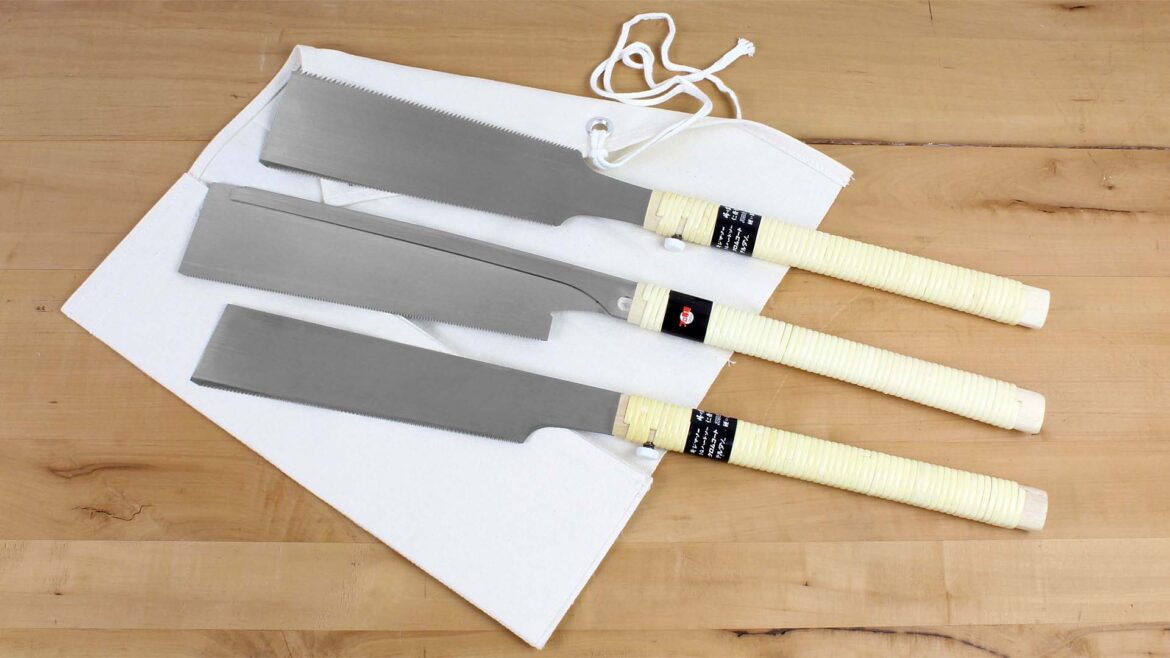
that all being said, let’s take a look at the types of japanese saws and what they’re used for, now that the context of their use has been established. there are three main types of japanese saws that are commonly-used but, unlike western saws, they’re not separated by their purpose or function but their shape. i won’t get into the technical details of what they’re officially called or the history of the names but we’ll call them by the (fragments of their) names they go by in the west because that’s what you’ll be looking for when you buy one unless you read japanese – in which case you’re probably looking in japanese-language resources for this particular guide, anyway. they are the ryoba, the dozuki and the kataba. i will talk a little about the more niche-focused saws in a bit but we’ll start with these three and all the niche-style saws actually fit in one of these three categories, anyway.
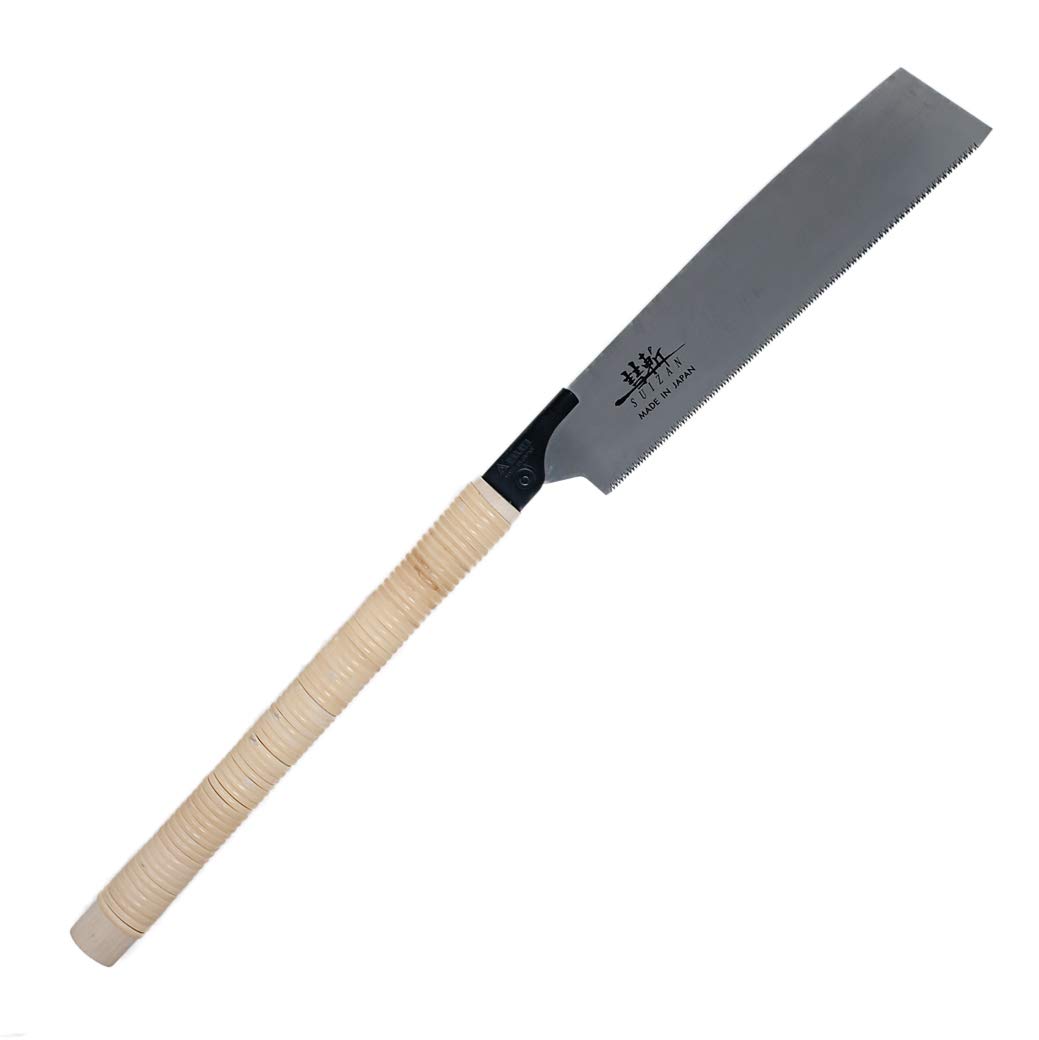
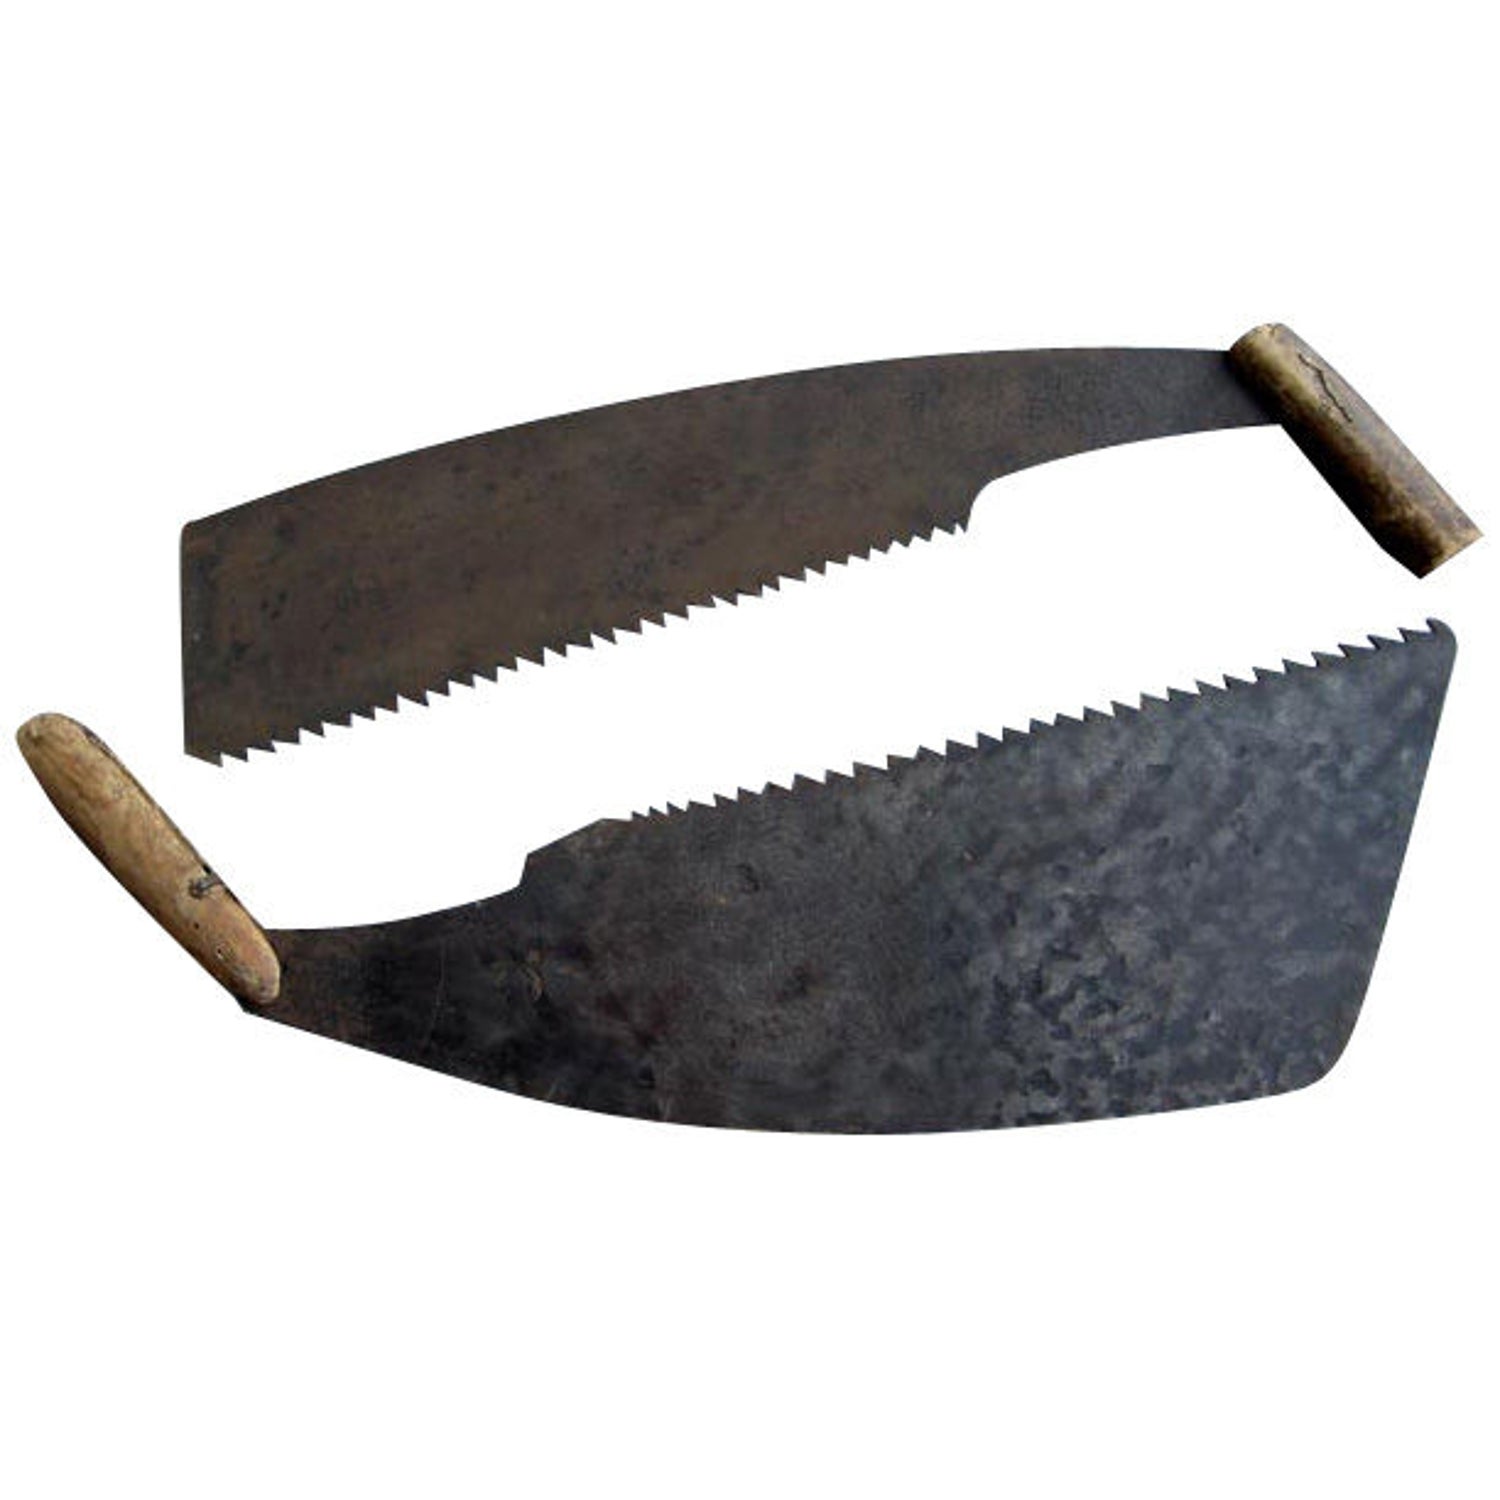
the ryoba is probably the most recognizably-japanese of saws. here’s one… (by the way, the photos of saws i use here are an attempt to represent all the major brands i recommend but they’re mostly just taken from official photography done of them and selected for clarity — just because you see a particular ryoba here doesn’t mean i think it’s the best, just a clear demonstration of what a ryoba is, for example.)
perhaps it’s good to start with what a ryoba is not because there are so many misconceptions about it. it’s not specifically a saw that has teeth for crosscutting and ripping on alternate sides. it’s not specifically a saw with teeth for hardwood and softwood on alternate sides. it’s not nearly that specific. actually, it’s not even necessarily a saw with a trapezoidal blade, though that is definitely the typical shape. a ryoba is a saw with no spine, a thicker (relatively-speaking) plate (resulting from the lack of spine/back) and two cutting edges with different profiles. sometimes this means one better for crosscutting and another better for ripping. but that’s certainly not a given and different saws approach this in different ways.
it may be useful to point out a few things here about tooth configuration. western saws are generally thought of as having a rip-pattern or crosscut-pattern tooth configuration. japanese saws don’t fit that differentiation at all. the way saws are generally classified is a little more complex than that but it’s much easier to think of them in terms of their pitch rather than their shape. a ryoba typically has one side with a fine (not super-fine but fine — this is a differentiation you’ll see a little later) and the other with a medium pitch, though this can vary. the important part about a ryoba is that it has two different pitch sizes (the distance between and, as a consequence, size of the teeth) but a single plate thickness. this means all cuts can be started with the finer pitch to make that easier then, if appropriate, the saw can be flipped to continue with more aggressive teeth without binding, something that would certainly result from beginning a cut with a western dovetail saw and finishing it with a tenon saw, for example.
a typical ryoba is particularly useful for doing joinery — cutting tenons, for example. it doesn’t have the limitations of a saw with a spine in terms of depth so you can cut a long tenon on a board without fear of running into anything. it’s fine enough to do this precise work but coarse enough to do it fairly quickly. but what is very important is that the “typical ryoba” sold in the west is only one example of the ryoba type of saws. any saw with a double-sided spineless plate is a ryoba saw (even if it cuts on the push-stroke) and some are used for rough construction work or even to cut down trees. as most non-joinery work is done by machine in the modern japanese woodworking world, there is little demand for these other types of ryoba but that doesn’t mean they don’t exist. thinking of the ryoba as only a delicate joinery tool or a slow saw would be an error. the short, fine ones sold by companies today including suizan, bakuma and gyokucho, however, are neither aggressive nor large so this is an easy trap to fall into. you can think of this type of ryoba as the equivalent of a western carcass, tenon or sash saw but i would certainly avoid thinking of it as in any way equivalent to a large handsaw or panel-saw, despite being able to do that work — it is only going to do it with a lot of effort and patience and is certainly not the best japanese saw for that purpose, despite what some of the advertising and youtube discussions may lead you to believe.
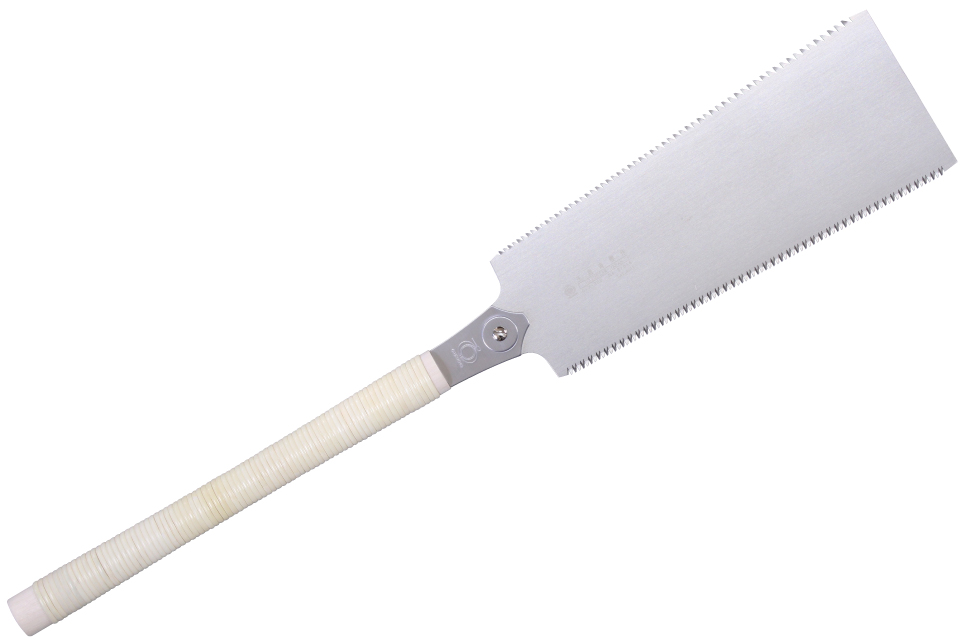
the other type of japanese saw that is extremely common in western woodworking circles is the dozuki. it usually looks like this.
“dozuki” is just the japanese word for what in english is called a “backsaw” or “spined-saw” — a saw with a rigid spine holding the plate to make it possible for that plate to be significantly thinner without losing any of its lateral strength. this is a joinery saw in all its iterations. you won’t see a dozuki with a thick plate. actually, if you see a dozuki with a plate that even approaches what in the west is considered a “thin-plate saw”, that’s surprising. japanese saw plates are generally significantly thinner than their western counterparts as a result of the in-tension nature of the pull movement so this isn’t just a thin saw — it’s an extremely thin saw. there was a master japanese woodworker who spoke of their “invisible-line technique” and what they were getting at was their ability to cut such a thin kerf and follow the grain of the wood so carefully and exactly that the cut itself disappeared into the pattern of the wood when it was assembled as furniture. while that’s not necessarily a realistic possibility to aim for in most cases, a dozuki has a thin enough plate for its kerfs to be confused for grain pattern in some species. unlike the ryoba, however, a dozuki (because of its spine) is limited in cut depth. it is useful for small-scale joinery like dovetail-type joints on standard case-pieces and indoor furniture. the dozuki can be thought of as the equivalent of a western dovetail saw but can be used for most of the work of a carcass, tenon or sash-saw if necessary, depending on the depth of the plate. it trades precision for speed – a ryoba will be a faster saw to cut with while a dozuki will leave a cleaner, thinner kerf. you will see dozukis with their outside edge curved, angled or perpendicular to the spine — this is generally a design feature and has no real impact on the performance of the tool, though a rounded edge is often a sign of a cheaply-made blade.
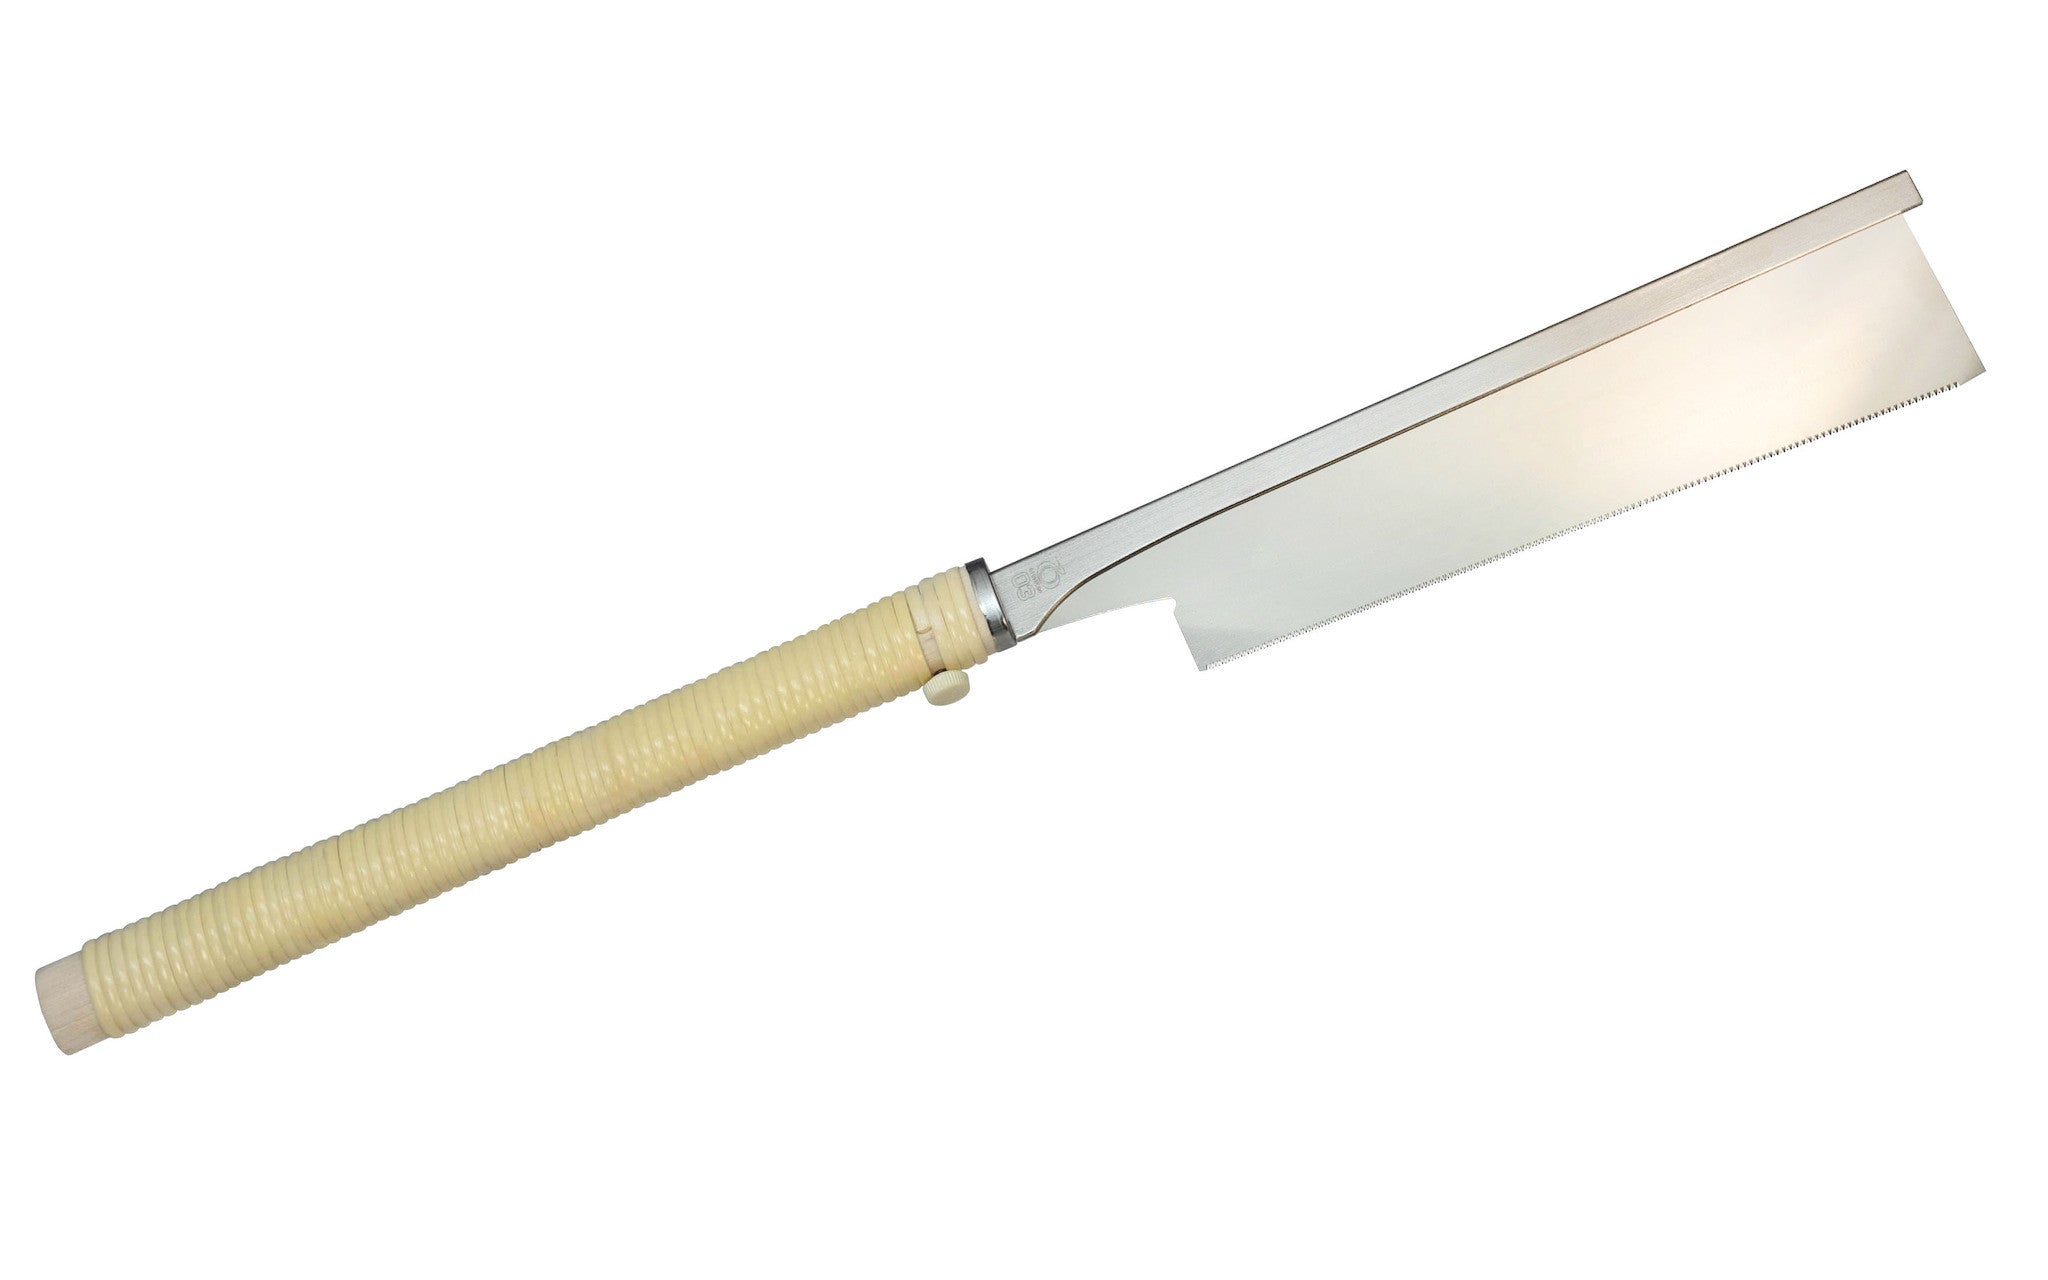
the third of the common saw types is far less common in western woodworking circles but the reason for this has always been unclear to me as it’s the saw i think is best to begin with if you’re doing all-around woodworking. the kataba is a single-sided saw. this is by far the most common type of saw in the world — kataba is the japanese term for what in the west is called a “panel-saw”. it looks like this.
the important thing to remember first about these, though, is that, while this is a great example of the form, this style of saw has infinite variation. these are also kataba saws, though a different subtype and quite rare now, though extremely common a century ago.
as far as i’m aware, these are not made anymore except by a few custom black smith shops where you can special-order one and negotiate your price in fractions of your country’s national debt. just don’t forget that if you think your kataba is small and therefore all japanese panel saws are thin, tiny saws with delicate teeth, you couldn’t be more mistaken. these saws were made to rip and resaw whole trees while other katabas were much smaller, closer to dimensioning or even joinery saws. they typically have a curved back (sometimes the curve is quite subtle) and a uniform tooth pattern. they can vary wildly in pitch but you can think of them as the other extreme from the dozuki. a dozuki is usually a super-fine pitch while a ryoba fits in the fine and middle pitch groups and the kataba ranges from the middle to the coarse and beyond into the brutal and extreme tooth sizes. the kataba is equivalent to the western panel and handsaws, large framesaws (bucksaws or roubo-style framesaws, for example) and rough carpentry saws like you see in hardware stores. in japanese hardware stores, where you might in the west expect a cheap disposable hard-point saw with a yellow handle, you’ll find a cheap rough-pitch kataba.
having gone through this list, you should now be able to identify any saw as belonging to one of these three types, including all your western saws. try not to forget that direction is a mechanical choice in japanese woodworking and it has a cultural background but these saws still exist on the spectrum saws from other countries and traditions also reside on.
positioning and holding your work
there are several ways to position and hold work for use with a japanese saw but this mostly depends on the cut you’re trying to make and the bench style you’re making the cut on. if you want to use a low bench, you have a choice of using clamps or vises or applying your body to the work. using your body as a holding method is generally seen as arcane and i won’t get into the specifics of how to do it — it is similar to using a notch or palm in western woodworking in that some people do it but it’s mostly a traditional-niche thing. if you have a high-bench, i would suggest not trying any of the body-position-workholding techniques you might see done on floor-style benches in videos as they’re impractical. i am assuming you are using a western-style high bench and the techniques i talk about here will work on these. i will discuss them given you have the common, roubo-style bench typical of american and european workshops with a thick top, sturdy legs and plenty of space. if this doesn’t apply to you, please take these guides as a starting point. if it does, however, this should be relatively-complete.
there are several possible positions for the wood and saw. these are not all of them but they are the most common tasks you need to complete. these are pictured as position diagrams and the saw shape/size is not a factor. this is also not in scale. the saw is pictured much larger than it actually is to show an approximate position and angle clearly without the size of the wood and bench making the picture too large to be visible.
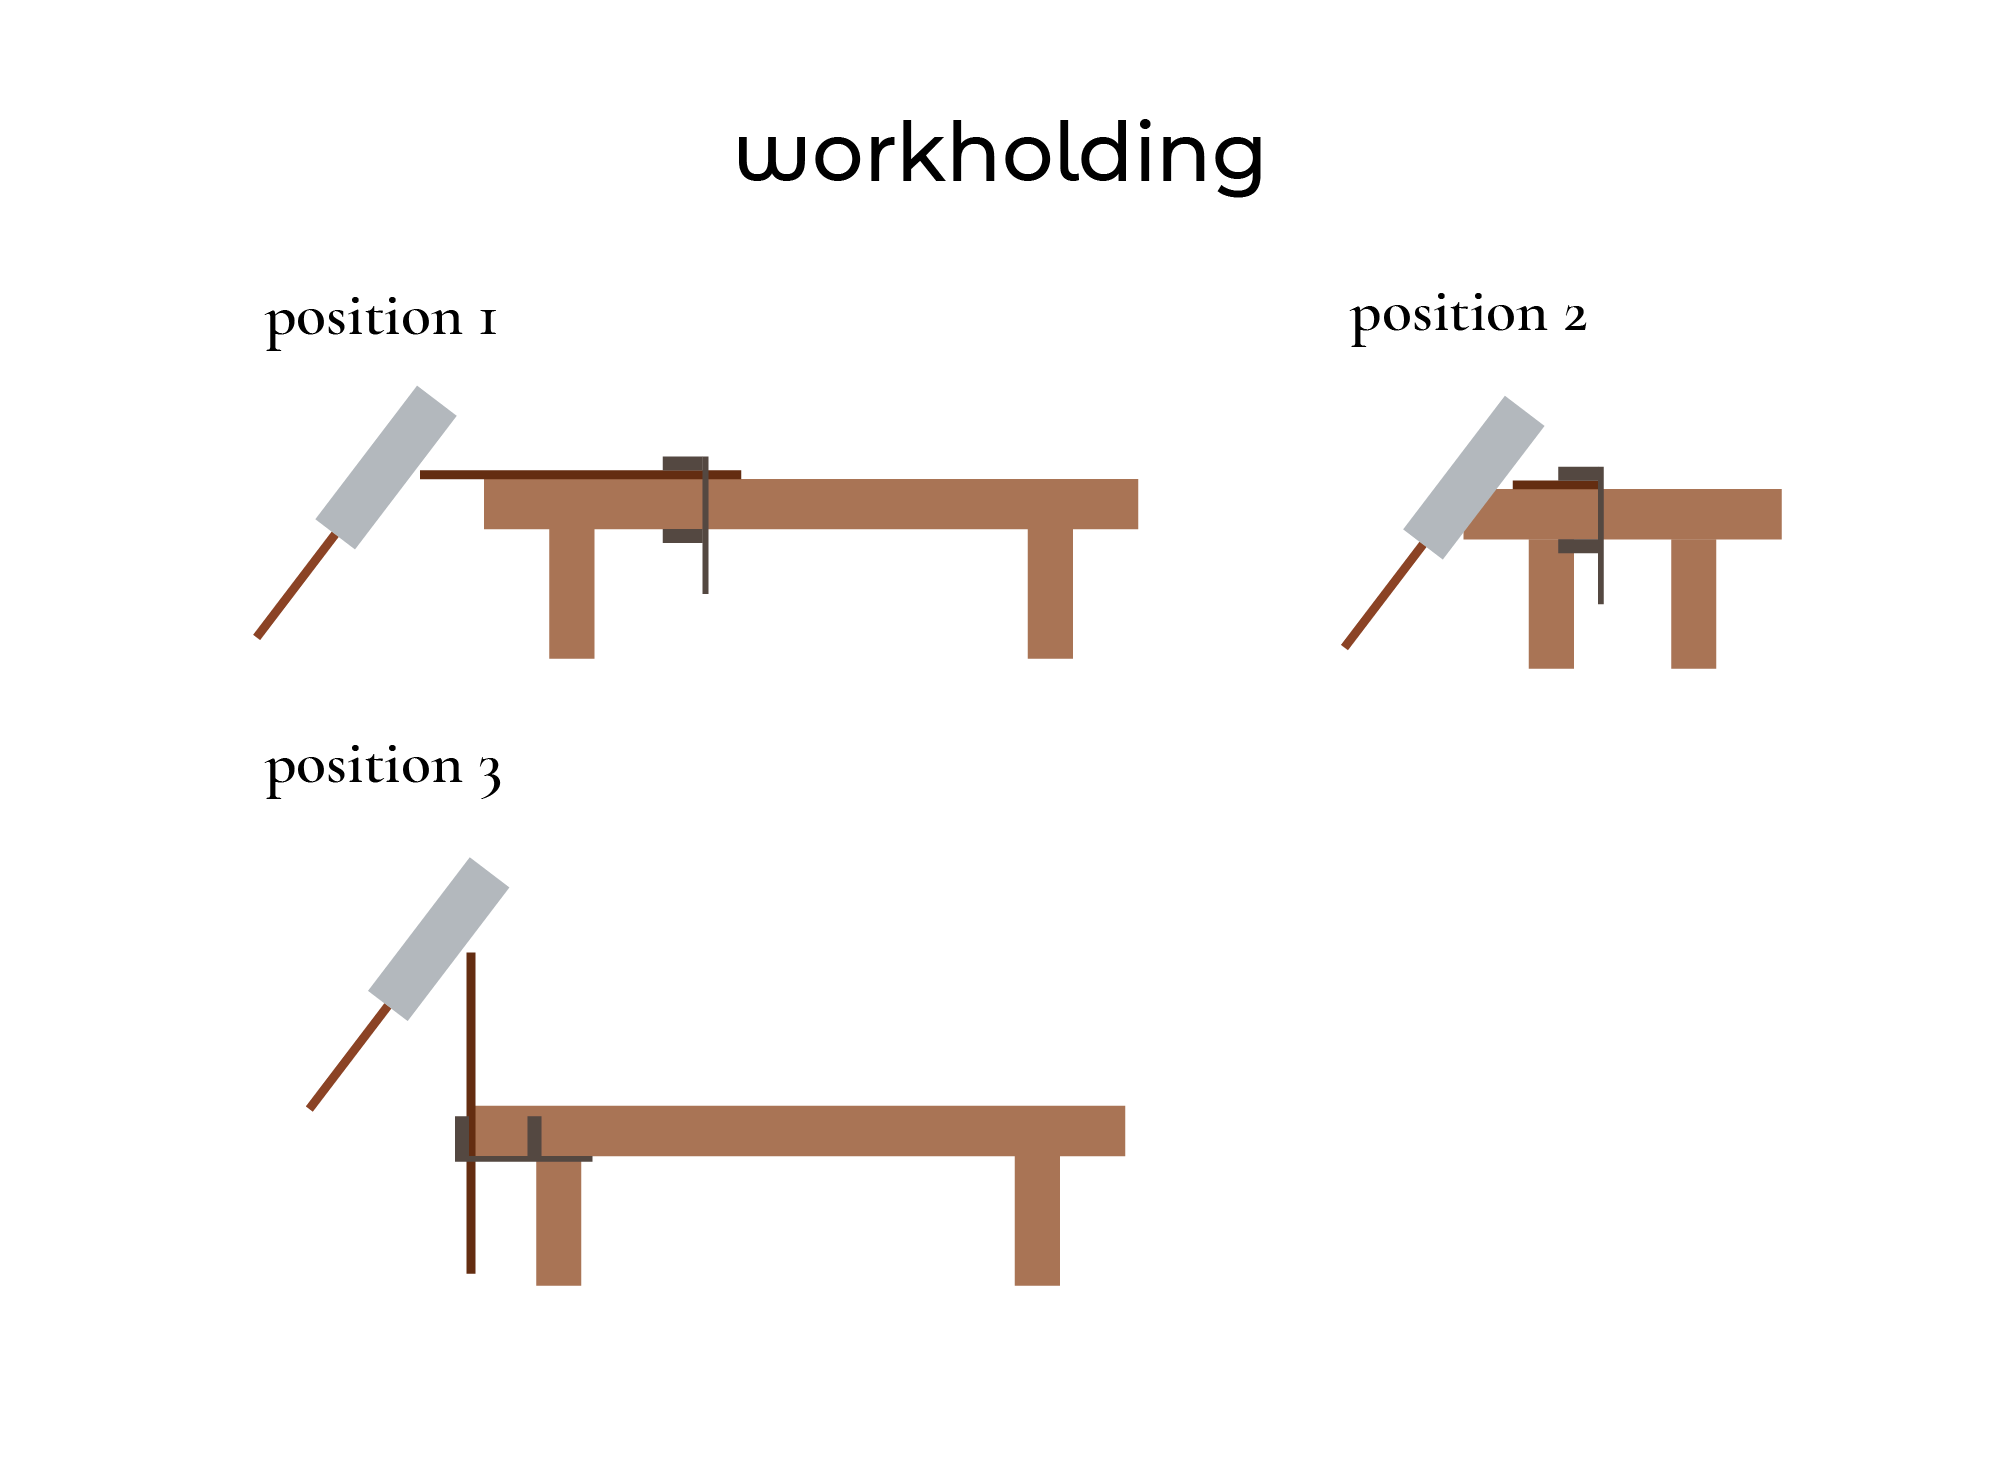
while these are certainly not the only ways of holding a board to work with a japanese saw on a high western-style workbench, they are certainly the most useful and common so they are the three i will deal with. we’ll look at when is best to use each and how it should be approached with the saw. the part this doesn’t cover is what to do if you have to cut on a low workbench. if you are vertically above the wood, it it best to bend over the wood and cut with the saw angled down from your body in a stroke bringing the tip of the saw perpendicular to the floor. as these low benches are uncommon, though, i won’t go into more detail here unless someone has specific questions about it. i assume for all these tasks you are using the saw in your right hand. if you are left-handed, feel free to mirror all these explanations and the same techniques apply in exactly the inverse. all japanese woodworkers traditionally worked right-handed regardless. you won’t see photographs or demonstrations from traditional woodworkers using their left hands as primary. there is nothing wrong with using your left hand. it was just expected apprentices copied their masters exactly so hand-preference was disregarded.
position 1 is the board flat on the bench with the end you are cutting sticking off the tail. you are standing facing the bench with the saw inline with the cut. remember, this is not that the body is centered on the board but that the saw plate is exactly perpendicular to the cut. you are not standing with your body centered on the saw but beside the saw and back from it (we will talk about body position in a few moments). position 2 is the board in exactly the same position but with you standing beside the board. the saw is in the same position but you have shifted your position ninety degrees. not every cut, of course, is inline with or perpendicular to the board but the vast majority are (for dimensioning and joinery) so it is easier to think of these as the two dominant workholding and standing positions. position 3 is far less common and we will talk about when it’s used but the board is clamped upright with one face looking at you and your cutting position is the same as in position 1.
position 1 is used to cut most joinery. dovetails and tenons are done in this way (there are japanese names for these joints and infinite variations on them but most joints are one of these two with potential added complexity). this position is also used to rip boards. position 2 is used for crosscutting and to cut the sides of tenon joinery. it is also useful for cutting miters, though those are rarely used in japanese styles. if you are cutting a miter, it is best to stand at that angle to the wood. position 3 is potentially used for crosscutting or ripping boards but it is generally not a preferred workholding position for use with a japanese saw. the reason is fairly simple — in this position, your depth of cut is limited and the force and accuracy that can be applied to the board is far less stable and direct with the board lacking its horizontal flat surface backing. each tiny movement of the board saps your energy and potentially increases inaccuracy, things that can be completely avoided if the board is firmly placed against the surface of the bench.
as for the actual workholding, traditional japanese workholding is done with clamps rather than vises. this is mostly because it allows more flexibility of placement. with the advent of modern vises, however, which include moving dogs and parallel rows of holes for dogs to act as multiple clamping stops holding a board flat against the surface of the bench, this method is also frequently used. to achieve positions 1 and 2 with clamps, it is a simple matter of putting the board close enough to one side of the bench for the clamp to reach both the bottom of the benchtop and the top of the board with good solid pressure. two clamps are usually sufficient. the type is unimportant as long as the board is secured in all directions. to achieve position 3 it is generally assumed a vise will be used or the board can be clamped against one of the legs of the bench. for positions 1 and 2 using a vise, the board can hang off the end of the bench pinched between a front-vise and a dog or hang off the side of the bench secured between a tail-vise and a dog. either is fine for this work. it is important to remember the board is meant to sit flat on the bench, however. holding the board in the vise with nothing supporting its bottom face is not typical.
saw movement is something that is often overlooked but vastly important to get the most efficient use of a japanese saw. while a western saw’s path of travel is intuitive, a japanese saw’s is a little less until you remember why the saw is shaped in this way. that requires a journey down the road of japanese history rather more distantly than woodworking in the west tends to travel for its inspiration. in the early part of the second millennium of the common era, during the high artistic period in japan, a warrior class emerged that would later be known as the samurai. you can think of this as being somewhere approaching low-aristocracy in the west, though nothing similar really existed in european civilization either then or later. these were warriors in one sense but their code of honor and passivity had reached legendary status long before their skills with weapons. they were the strong arm of peace, you could say. as a history teacher, this is a topic i could write an entire book on but the result was that, over many centuries, the samurai class eventually lost its financial backing when peace was more the norm than war and had to take up skilled crafts. their swords were of little use beyond decorative symbols of wealth that often didn’t exist. but they were the model of perfection in japanese society. there was additionally a general assumption of guilt and fault. western society was built on the idea of self-sufficiency and looking out for yourself, taking responsibility. but japanese society was built on community responsibility and the notion of taking care of others. most japanese tools were the result of these ideas coming together. japanese saws are used on the pull-stroke not just because it’s more efficient (which it is from a mechanical perspective, though this doesn’t make it “better” than western saws, which have a different advantage to compensate) but because the idea of group-responsibility meant if you hurt someone you were responsible even if they weren’t being careful. so you had to be far more. working together in small shops meant controlling a tool pulled to you was far less likely to potentially cause harm to another than pushing with your body’s force against something. the other piece, though, is the sword. while most woodworkers weren’t samurai, almost everyone in japan certainly respected their tradition and it was common for all peasants to have at least some experience with edge weapons. these were not the heavy swords in the west that went with metal armor and slow, cumbersome swings to brutally sever limbs by force. japanese saws were thin, light and wielded by people who were mostly without armor in the traditional sense, sometimes wearing the highly-stylized leather protective gear of the late shogun era but that generally came much later. swords were a question of skill rather than force. they were extremely thin but the significant part here is to think of the movement of the sword. you lift your hand with the sword in it and slice down in a single stroke through your enemy. you hold the sword very lightly right at the end for maximum downward momentum and it is a clean cut from the sword being slightly above your head and angled up with your arm bent and out in front of you to your arm being mostly straight by your side, lower, with the sword pointing almost straight forward. this is the general pattern followed for a japanese saw in its use, too.
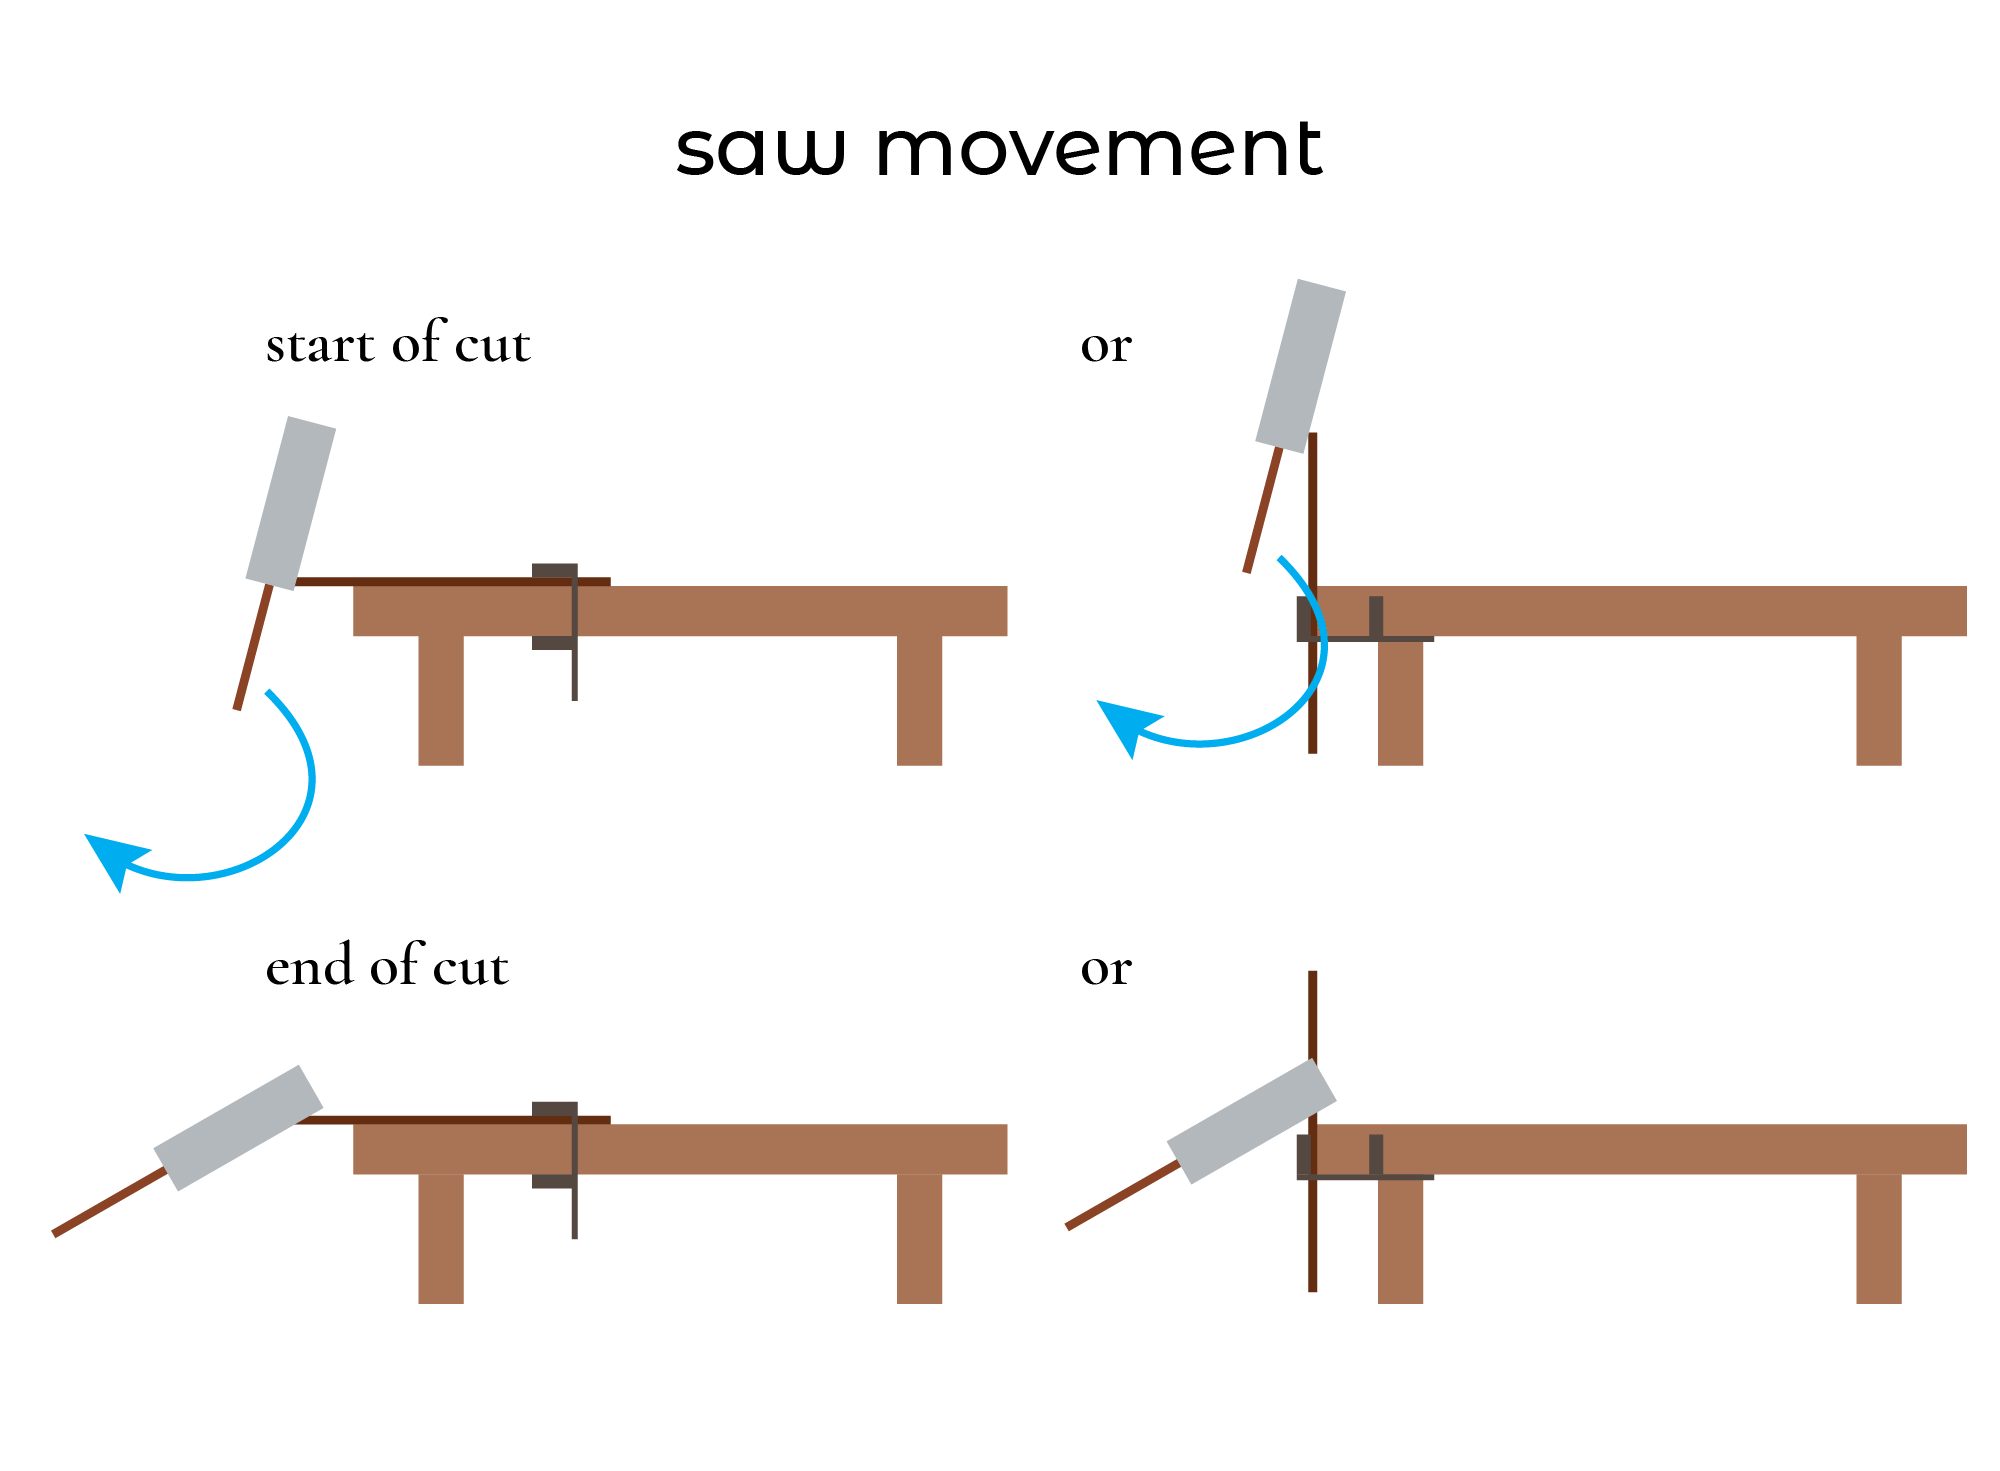
with the board in positions 1 or 2, begin with the near end of the saw plate against the end of the top of the board, starting about 1cm from the near end of the plate. swing the handle of the saw down and closer to your body until the saw has reached about 1cm from the far end of the plate then reverse the stroke. use the entire length of the saw in a single motion in both directions. when you are beginning, you can start and stop 2-3cm from the ends if this makes it easier not pull the saw too far but you will quickly learn where both ends of the plate are. in position 3, again start and end in the same places on the plate but start with the saw on the side of the board facing you rather than up. continue to repeat this until the cut is complete. at the beginning of the cut, the saw should be significantly angled up. when the saw is at the end of the cut, it should be close to perpendicular to the board. for the last few strokes, it is often necessary to change these angles slightly but they are the most efficient and effective so they should be maintained as long as possible while still cutting the correct line.
the first two strokes are extremely important. if these are in the correct line, the rest of the cut will follow. if they are not, stop and return to the point where they were correct and cut from there. attempting to twist or skew the saw in the cut will simply damage the saw and the cut will still not be straight. a japanese saw has a thin plate under considerable tension during the cut. any pressure other than inline with the saw will bend the plate and break teeth. you can cut almost any material with a good-quality japanese saw if you apply pressure inline with the plate. the softest wood cut using a stroke that is not inline can destroy a saw in moments. this is a general rule with japanese tools — they are meant to be used in a single direction. with saws, it is particularly important. a chisel will bend over time with poor form. a plane is almost impossible to use any other way. a few degrees of twist or lateral force for a single stroke can break teeth from an expensive tool and must be avoided at all times. in terms of speed, a comfortable speed is best. if you find the work difficult, slow down. if you feel you can move more quickly without exhausting your body, speed up. there should be a rhythm to the work and your breathing should be deep and easy as you saw. if you feel like you are working hard enough to sweat, you are working too quickly. if your saw strokes are not all at the same speed, either slow down or speed up to make them regular. japanese woodworking is an exercise in harmony with the body and the material. jerky movements will lead to inaccurate joinery, exhaustion and physical injury.
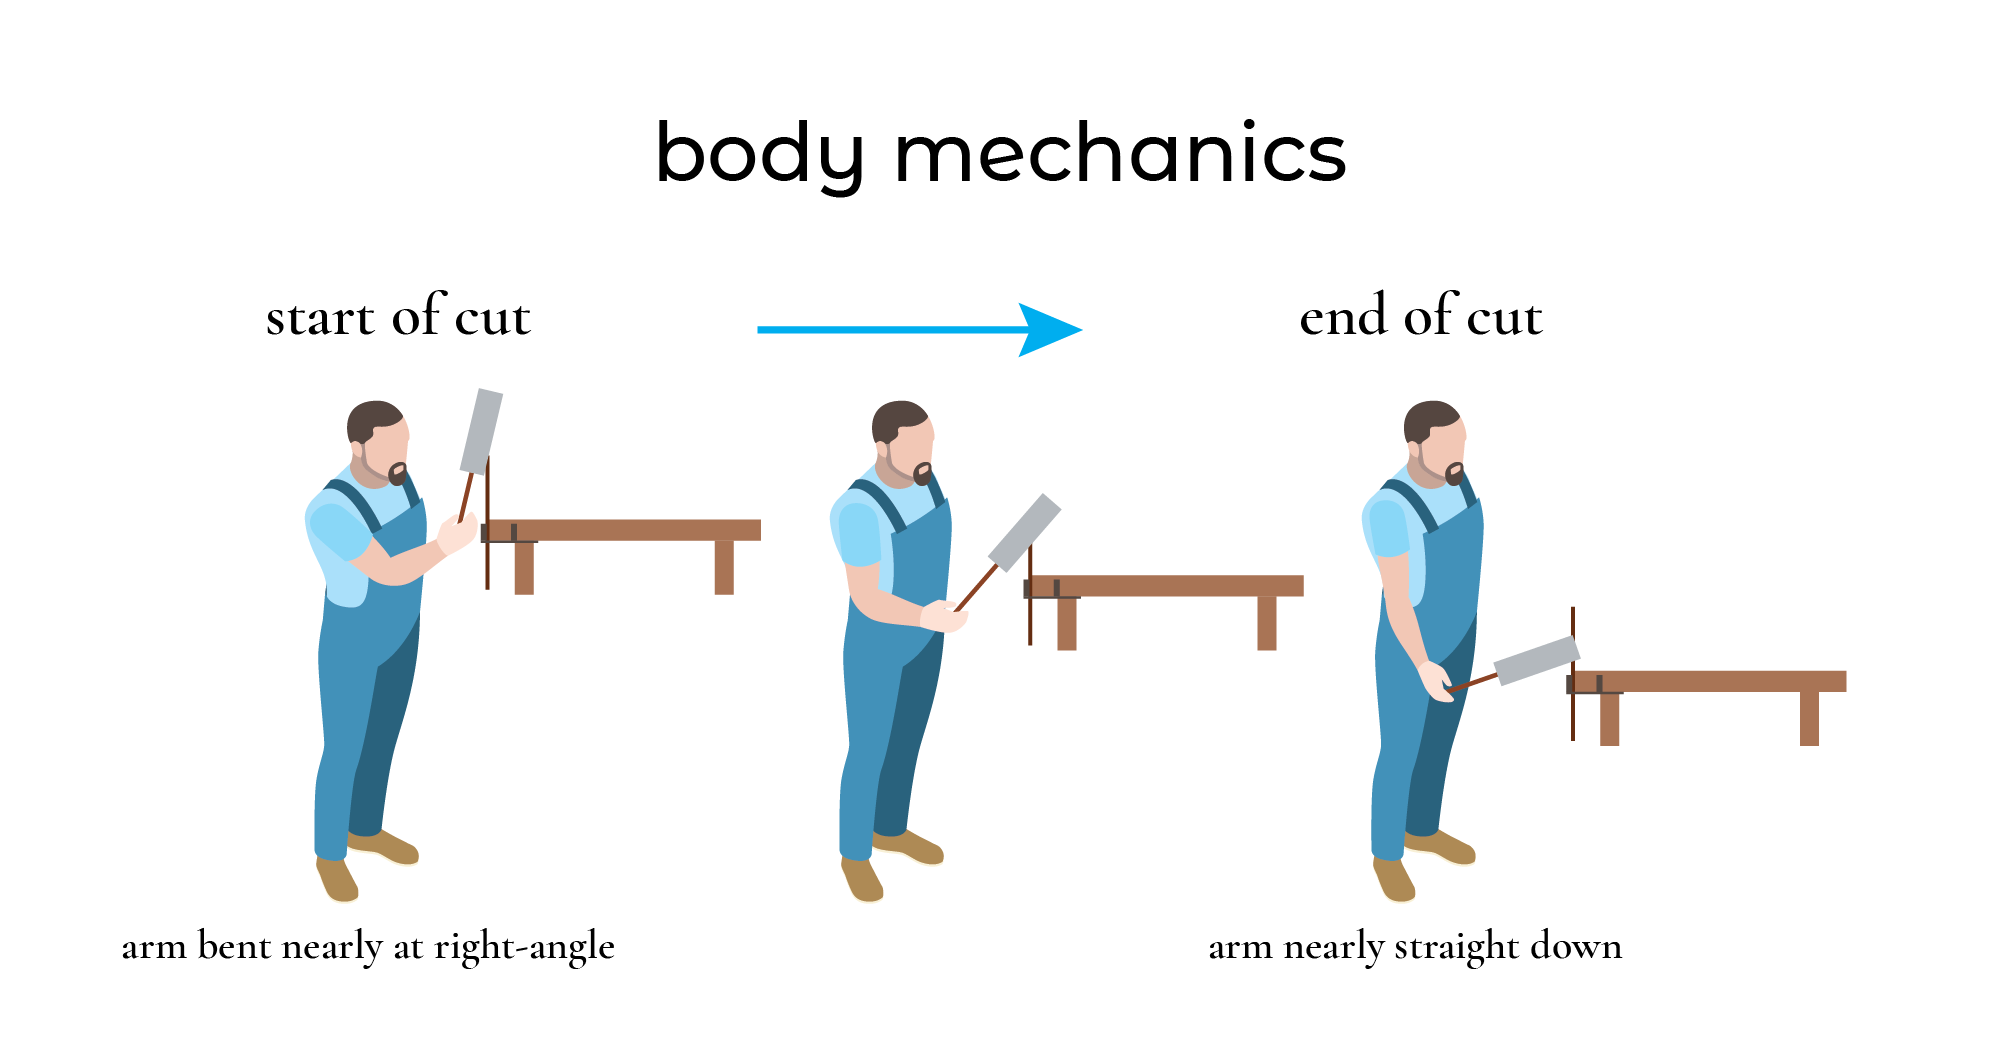
the body mechanics are, i believe, somewhat obvious from the position of the saw as we have just discussed it but i think it’s important to be absolutely clear about position and movement as i have seen body positions that are awkward, painful, potentially causing injury and certainly leading to inaccuracy and damaged tools not just from beginners but experienced instructors who advise things like standing behind the saw or holding it with two hands while making a cut.
hold the saw in your right hand (we will talk about hand position in a few moments but just assume you’re holding it like a sword — you’ve certainly seen enough martial arts movies to know how a samurai sword is held, i have no doubt). your arm should be beside your body in a comfortable position, extending in front of you. it shouldn’t be coming across your body or angled away, just straight forward. your elbow, at the beginning of the cut, should be somewhat bent. as you go through the cut, drop and straighten your arm. don’t lock it down straight but extend your elbow as you pull the saw through the cut and the handle closer to your body. the saw is moving forward and back, not side-to-side. any lateral movement is to be avoided in all three items concerned — the saw, your arm and your body. they should be swinging in a single arc inline with the cut. you should be facing the cut, body inline but off-center to the left so your arm and the saw are directly inline with it. do not stand behind the saw. it needs to be free to swing by your side without your arm leaving the plane of the saw and the cut. keep one hand on the saw handle and the other relaxed on the other side of your body. there are some specialized tools that require two hands. these are generally rough-milling saws. if you are cutting joinery or dimensioning boards, one hand is sufficient. if one hand gets tired, you are welcome to switch but, realistically, if your hand and arm are getting tired, you are putting too much force into the saw or working to quickly, possibly both at the same time. slow down and stop putting pressure on the saw.
this brings us to the other point. how much pressure should there be on the saw? this depends on the direction of the pressure. you are pulling the saw closer to your body. that is the direction of all your force and that force should be only just enough to make the saw move in the cut. if it requires more than gentle pulling in the direction of your body, it is not sharp enough and you should replace the plate immediately. there should be absolutely no down-pressure on the saw at any time. i will say that again to make sure it’s clear. pull the saw. do not push it down at all.
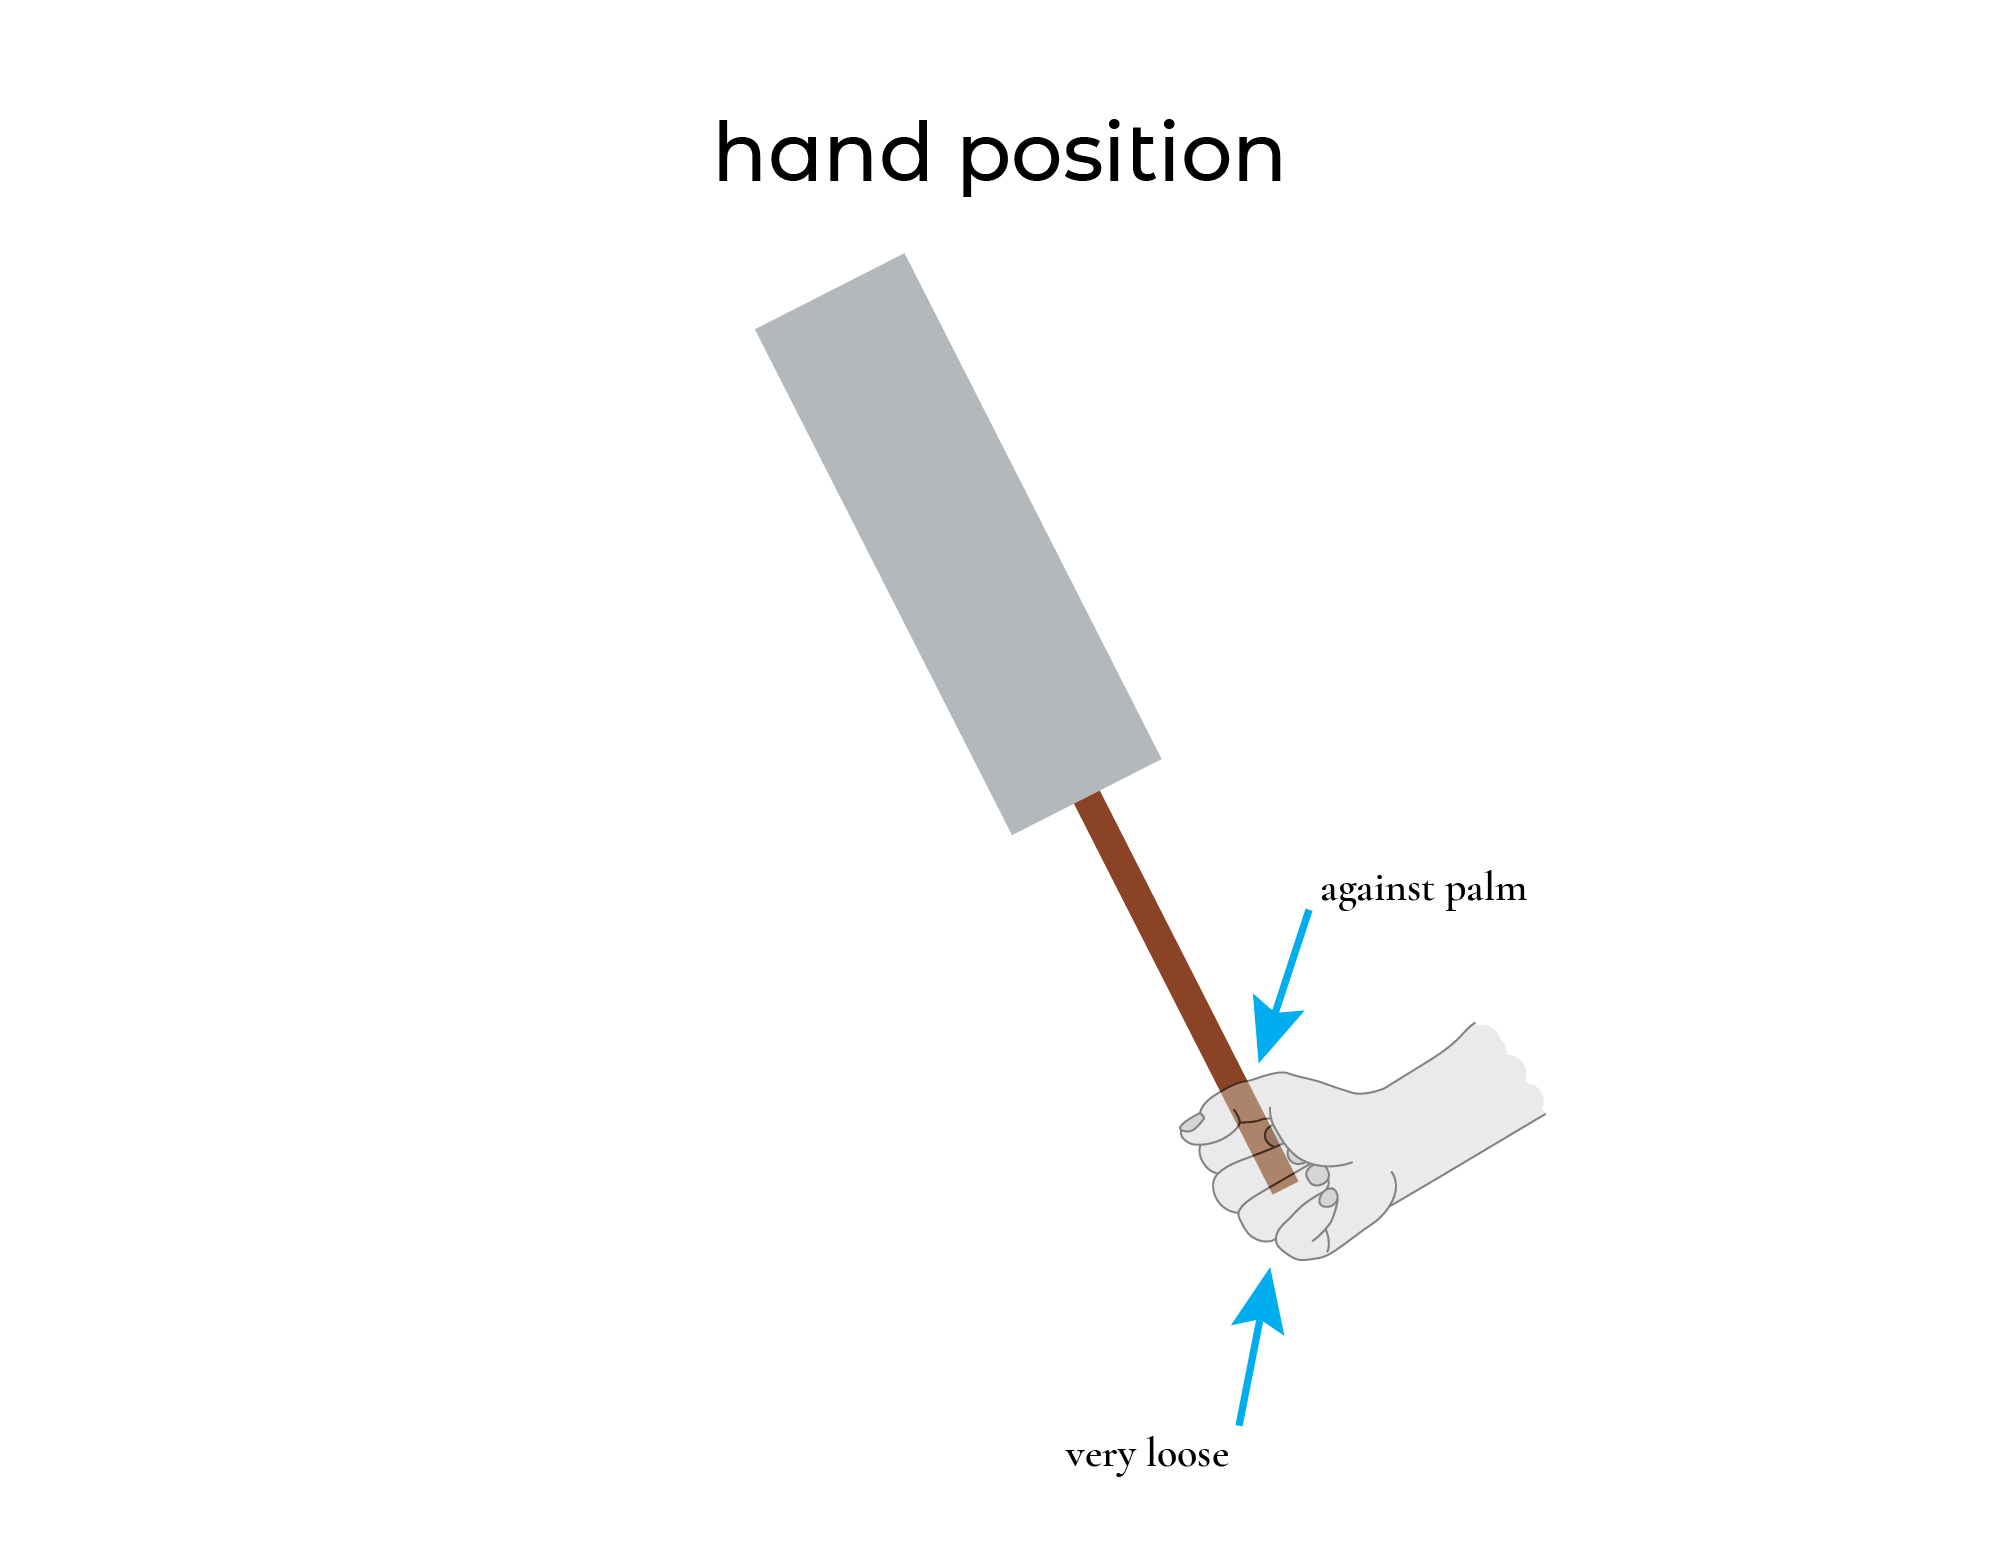
when you are holding the saw, it should be extremely gentle. you can keep your whole hand on the saw but i find the last finger and often the second-last on my hand are past the edge. you are really only gripping it between your thumb and first finger or two, the others are just for stability, anyway. there are many ways to describe the amount of grip you should be using. some say it is the same as holding the hand of a baby but i have seen some large-pawed hypermasculine types put more force than i would use for my saws when holding a child’s delicate extremities so my usual guidance is that it is about the amount of force you should use when holding the egg of a small bird without cracking it. if you put enough force into your saw handle to crack, for example, a chicken’s egg, that is many times too much pressure and you are tensing your arm and hand muscles and exhausting your body. this is how a japanese sword is held and the saw was modeled on that idea.
these concepts of saw, body and hand position can be applied to all japanese saws and techniques. they are not specific to the ryoba used in the diagram or one form of joinery or cut. all saws can be held and used in the same manner and this allows you to develop a rhythm and familiarity with the tools and achieve precision.
specific woodworking tasks
some tasks may be useful to describe in detail. to cut a board to length, use position 2 and simply cut through each end in turn. to rip a board, use position 1 and cut a straight line to the end of the rip. it is not necessary to cut to the end of the board. if you are ripping and crosscutting, though, it is best to crosscut first then rip because it reduces the tension inherent in long boards that can bind on the saw.
resawing can be done in one of two ways. i recommend tipping the board on edge and using position 1. if the board is short enough to be sawed vertically, position 3 can be used for this with the board held against a solid, stable surface. this should not be the end of your bench. it can be a leg going all the way to the floor but the small surface area of the end of your bench is not sufficient to stabilize the cut and you will likely end up with shaking that will cause lateral force on the saw and potentially damage it.
to cut dovetails, which are extremely common in japanese joinery, though they go by various names depending on their shape and are often hidden within pieces, begin by cutting the tails using position 1. follow this step by cutting the sides of the tails using position 2 from both sides. you can flip the board and cut from the same side but there is no need. you can just walk around the board and cut to save yourself the trouble of unclamping and reclamping it. chop the waste using a sharp chisel (i won’t get into chisel use here but i’m happy to discuss it if anyone has questions or desires a detailed explanation of this procedure). mark the pins with a pencil or pen (ink is traditional in japanese joinery but has mostly been replaced by pencils in the modern era, not just the last few decades but since about the beginning of the twentieth century). cut the pins using position 1 and use a chisel to remove the waste. you can certainly use a fret-saw between your dozuki and chisel if you prefer that approach. those small frame-saws were not typically used in japanese woodworking shops and have had very low adoption as chisels tend to be both large and sharp and make quick work of joinery cuts with greater accuracy than saws.
to cut a tenon, begin by cutting the correct depth on the faces then the edges using position 2, turning the board. when you cut the faces, they should be pointing left and right when you are facing the board preparing to saw. when you are cutting the edges, these should be facing left and right. you will only need to turn the board once. you have now finished the shoulders. cut the cheeks using position 1. it is common to cut the cheeks on the long edges using only a chisel but sawing is also frequently-seen so either approach is acceptable and traditional, mostly chosen based on the amount to be removed. if it is less than a centimeter, a chisel is likely faster. a larger waste piece will probably reward a saw with more efficiency.
having discussed the joinery in detail, it is important to clarify something about accuracy. while japanese saws are highly-accurate in an abstract sense, they are not chisels. we do not cut on lines or to lines. we cut slightly away from the side of a line in the waste material and use a chisel to complete the cut. guide blocks to keep the saw in exactly the right position are sometimes used but these are generally more common for chisels. as the saw is not expected to leave a precise cut without at least a small amount of paring, its accuracy irrelevant in the most complete sense. there is no shame in japanese woodworking to using a jig, guide or modified tool to complete a task. almost all chisel cuts are made using a guide. if you are attempting to saw more accurately, make yourself guides. they are frequently used to teach apprentices to saw straight and masters use them for long, straight cuts on a regular basis even after decades. japanese woodworking is not about showing the marks of the maker. it is about absolute perfection. if the cut is not perfect, it is shameful. if there is any inaccuracy, it is shameful. shameful craft skills were not accepted and frequently punished with physical injury, loss of family status, monetary cost and, in extreme situations, death. there was never any reason to take this risk. you shouldn’t have one either. make some guide blocks and sawing jigs and consider it part of the traditional approach. if you want to do things freehand, put down the japanese tools and return to western woodworking because freehand doesn’t give the absolute perfection and accuracy japanese tradition and aesthetics require.
of course, that sounds rather heavy-handed and i am certainly not telling you that you shouldn’t use a japanese saw inaccurately. but there is a notion in the west that guides and jigs are non-traditional and that it is always more skillful or enjoyable to do things freehand. in the japanese tradition, there is no “graduation from jigs” or “no longer needing paring blocks”. perfection requires using guides for guaranteed accuracy. in a society where wood is extremely valuable, time is priceless and anything short of aesthetic perfection is seen as a personal insult not just to the client but the entire spiritual world and its inhabitants, there was no room for error. measure twice cut once? not on your life. measure once, build a jig to guarantee accuracy, hold everything so it can’t possibly move then cut decisively. it is considered respectful of the tree to be accurate and ensure perfection. anything else is shameful to its spirit.
other questions
there are a few other questions i have been asked that i will now address here as they don’t really fit in any of the existing sections. if you have specific questions, please feel free to ask. if i haven’t covered it here, it may require a detailed answer, a new article or simply adding a section to this one, all of which i’m happy to do.
the first of these questions is about the common western approach of sawing boards using a triangular cut method. there are reasons why this is effective and wise in the west, though i suggest most of them can be avoided by simply using a sawing guide and saving a lot of time and effort. given the fact that a japanese saw will cut straight when it is pulled, there is no need for flipping the board, rotating anything including your body or cutting triangles. it doesn’t matter whether you can see the other side of the cut. it is straight. if you line the saw up and the first few strokes have produced a cut in the right plane, it will continue that way unless the saw itself is damaged, in which case replace the plate and try again. if you are sawing the wrong line, stop and saw the right line then continue. do not try to twist or redirect the saw. you will simply break the saw and annoy yourself in the process but not fix your cut.
the second question is about sighting. western woodworkers often draw lines on all sides of a cut. japanese saws obviate this need. when dovetails are marked, for example, there is only the need to draw a single line on the top face of the board from the end to the base of the tail you are about to cut then cutting on that line. when you are cutting on a line, you are looking down at the top face of the board so marking other faces, ends and edges is pointless. marking should be done with a pencil or pen in a way that is visible to you without needing to get closer than a meter. if you can’t see a pencil line on the board at a meter, use a pen. if the pen is too difficult to see at that distance, use a marker. don’t get closer or “choke-up” on the saw. this is a beginner error that would never have been let pass unpunished in an apprenticeship situation even the first time. you’re not trying to hit a baseball. take your time. if you can’t see, fix the fact that you can’t see until you can before you saw. inaccuracy comes from rushing. so don’t rush. it’s disrespectful to the tree. remember you are only ever going to see what is on the left side of the blade. don’t bend your body out of shape to look over the saw. if your arm is straight and your saw is good quality, you will cut a straight line. if either is not, it doesn’t matter where your eyes are — at that point, you have already made a mistake before the saw has even touched the wood and you should correct it then, not after you’ve damaged the piece and attracted your own disgust with yourself. that’s not about skill. it’s about preparation and thought. most of this practice is about preparing and thinking rather than doing. using a japanese saw doesn’t require skill. it just requires patience and being slow, methodical and self-aware. you can get every cut perfectly-accurate the first time if you are careful. so be careful and your results will make you happy and proud. try not to be too proud, though. the tree did the hard work and sacrificed its life. you only spent a few minutes compared to its years and death. it deserves most of the credit. when you are looking down at the board, you should see where the saw is and make sure the line is going in the direction you require. the important part, though, is not about cutting close to the line but about making sure you don’t get too close to it. the line marking the end of your cut should be clearly visible and you shouldn’t touch it. you also shouldn’t touch the line marking the cut. keep at least 1-2mm from both your cut-line and your stop-line. that is a place only chisels may go and their spirits will haunt you if you intrude on their domain. seriously, though, you’ll be happier if you stay away and pare every time. it’s an excellent habit and very traditional.
final thoughts
i am honored you have taken the time to explore this topic with me and deeply hope you have found this discussion useful. thank you for your respect. i wish you the best of luck with your endeavors in the land of japanese saws and traditional woodworking. please, of course, let me know if you have any questions about this or any other aspect of the craft. i am more than happy to provide answers on anything if i can or, if i am unaware, consult with those with decades more experience in the tradition to find you an answer, if possible.
ありがとうございます。