
veneer is a whole different world of woodworking. it feels distantly-related but it avoids so many of the typical parts of working with an organic substance — it moves but its movement is generally irrelevant because we stick it to things that don’t and that solves the problem. and it’s realistically treated like a two-dimensional substance. so it’s not surprising many woodworkers, especially those working by hand, tend to treat veneering like a foreign country unless they’re doing decorative work like marquetry or inlay — even that is often overlooked as a possibility and i’ve rarely seen much from the hobbyist community. veneer has been given a terrible name by the cheap furniture from target and walmart and costco. it’s nothing more than thick cardboard with artificial wood glued to the outside and, yes, that’s veneer. but veneer has a long history.
king tut and the joys of wood-grain
five thousand years ago, the egyptians (well it was either going to be them, the mesopotamians or the chinese, right? did any other civilization actually invent anything? not really…) lacked wood. if you’re curious why, look at a map. egypt is a desert punctuated by a few massive rivers. not much grows there except right next to the rivers. and those are so densely-populated it’s almost all devoted to crop-production, not unexpected as dry-land agriculture was perfected there around the same time. but they still had to build things and wood, precious and scarce, was absolutely vital from an aesthetic and structural perspective. much of the lumber was mediocre. but thin slices of wood were used to veneer the surface from the most prized of trees to build beautiful furniture (and body-holding devices) for the pharaohs — both in life and death. of course, this started with quite rough sawing but moved on from there to thinner and thinner sheets to get more yield from a single tree and artistic forms were quick to develop. interestingly, much like today in much of the western world, their veneers were imported and adhered to locally-grown wood purely for visual effect. while it’s often customary to think of the ancient world as being obsessed with function because they simply had no other choice, this is a clear exception — actually, they were just as obsessed with aesthetics of things then as now but that’s a whole other story. to see just how far the art had come by the time of the new kingdom, browse through photographs from tutankhamen’s tomb and you’ll see the vast majority of his wooden accoutrements were veneered — not just slices but inlaid patterns mixed with precious stones and metals. nothing more complex was really done until several millennia later with chippendale’s extremism.
while the early times of veneer show it was extremely common in practice across the middle east and throughout the persian, greek and roman empires, the decline of civilization at the end of the roman period and the rise of byzantium realistically spelled the end of veneering for about a thousand years, much like with everything else in the west — thought died and the light that showed up in the renaissance is why the period has traditionally been thought of as the “dark ages”, though we now generally don’t use that term because, for some reason, people think the europeans might get insulted if we noticed they were really stupid for a while. honestly, i’d be more worried if they were still acting that way, mired in delusional reactionary conservatism and stuck in mythology against the progress of science and intelligence. you know, like the western world today. so perhaps the real reason we don’t call it the dark ages is that the age was in the middle but the darkness really only receded temporarily as we shifted from using the church as an excuse to using the economy. just a thought. but i digress. we’re supposed to be talking about sticking things together and making art. my bad.
from the beginning of the renaissance, starting mostly in germany, extending its reach more and more as baroque styles were more embraced, veneering was resurrected in the west. this wasn’t a cheap way to build furniture. you weren’t going to see the ancient equivalent of the $5 walmart dining-table in a renaissance-era farmer’s cottage. veneer was only for the rich. it wasn’t just done by hand. it was done by expert, highly-trained hands and it was purely decorative. plywood was a whole other thing but that was, again, something not yet mass-produced. it’s a story like plastic in the modern era — now it’s the cheap alternative but when it first came on the scene it was treated like a newly-discovered precious-metal.
italian and spanish craftspeople developed new techniques for veneering curves and the germans invented and perfected the fretsaw, perfect for cutting intricate patterns we now generally refer to as marquetry. the french and english soon followed these trends and the entire western world was on fire with veneering. (take a look at the louis xiv and xv collections if you’re curious just how decorative this got in this period. it’ll shock you. repeatedly.)
things shifted in the nineteenth century as veneering, along with everything else in the world of production, stopped being a hands-on process and automation was the watchword of the day. brunel’s mechanical veneering machine was quickly followed by faveryear’s veneer slicer, followed only a few decades later by the first production factory opening in germany devoted to the commercial production of veneer. from a technology to gild the already-expensive furniture of the upper-classes to an industrialized option so everyone and their dogs could afford ebony, rosewood and mahogany, the shift was immense and cheaply-finished-dining-tables were just around the corner. along with some of the most expensive decorative furniture ever made — think federal-style furniture, for example.
in the twentieth century, veneer production became completely automated and trees were processed into veneer far more than even regular lumber, mostly to make plywood, a strong material whose perpendicular grain stacks make it stable and eliminate the need to worry about wood-movement. the veneering revolution had come and gone and the beneficiaries were generally the mass-produced-furniture industry and anyone who wanted to build tables in a half hour from sheet goods. but if we look at traditional decorative veneering we will find something beautiful. the ability to do things we couldn’t possibly do with solid wood — either because it moves or because the wood itself is prohibitively-expensive — want an ebony desk? a rosewood cabinet? these, too, can be yours without sacrificing your life-savings if you buy them only a half-millimeter at a time. (ok, some are three times that thick but the really thin ones tend to be the cheapest.) something to remember in this age of an environment we’ve systematically plundered and destroyed, by the way, is that veneer is an extremely stable way to use a tree. it’s not at all unusual to get five-hundred and sometimes a thousand square-meters of veneer from a single tree. compare that to the yield from a log in terms of solid wood and you might start to wonder why the environmentalists haven’t started to protest in favor of veneering.
so that’s the history. let’s talk about how to do it then move on to actually building a simple project with veneer.
let’s grab a slice
there are many ways to get veneer from a board and most of them are industrial — you buy commercial veneer. and this is what i would recommend if you’re starting out in the world of veneering. commercial veneer is usually between .5 and 1.5mm thick and comes in pretty-much every species, color, variant, cut-pattern and grain-style you can imagine. it’s relatively-inexpensive. but you’re a purist and you probably want to make your own. and there’s absolutely nothing wrong with that. it’s actually surprisingly easy. especially if you have a bandsaw and a thickness-planer. but you don’t need either of them.
first, the powered, simple way to cut veneer. with shop-made veneer, you’re aiming for a final thickness of about 1.5-2mm — definitely no thicker than 2mm and if you can get it closer to 1mm you’re probably going to have better results. why so thin? well, the whole point of veneer is that it doesn’t move. i mean, yes, it’s nice to be decorative and all that. but if it moves when it’s attached to another piece of wood, whatever it is, it’s going to tear itself apart and that’s not good for anyone. at <2mm, the glue is strong enough to restrain the internal movement. thicker than that and you’re really just talking about a wooden panel and movement is the watchword of the day. avoid that.
the powered route
if you have a bandsaw and a planer, this is the simple process. plane both faces of a board so they’re flat and parallel — you know how to do that already as you’re a woodworker (if you don’t, go back to one of the articles about stock-prep but i will assume if you’re setting out to try veneering you’ve mastered the art of making a board flat and level. make a mark on the flat face to indicate which side you’re cutting from (i usually write “planed” but you can choose your own adventure), place the board with its other face against your bandsaw fence and resaw a slice at about 3mm. label the rough face of the resulting piece as “rough” or something that will remind you which face is which. remember to keep the offcut side of the board on the non-fence side of your bandsaw fence or you can get pinching between the fence and the blade, which can be dangerous, damage the piece and break your blade in very short order, often all three at the same time. take the board back to the planer and flatten its newly-rough side, mark it and repeat the resawing process until you’ve cut all your veneers. the last piece from that board already has a smooth face (which you have already marked) so you’re all good. don’t bother to smooth the rough faces now. it’s difficult and far easier at a later stage. just assume we’re going to do that.
the hands-on approach.
slicing veneer by hand is simple. it’s just painfully-slow. it doesn’t matter what you do. even a wide-toothed panel saw is simply not going to get through slice after slice of a board very quickly. if you want to do it, though, the procedure is easy enough. flatten and smooth your board on both sides. stick it in your vise and start cutting a slice off one side about 3mm from the edge and resaw all the way through. make sure you label the faces (smooth, rough). smooth the new rough surface of the board and repeat until you’ve run out of board. same process as the powered route.
getting sticky with it
either way you prepare it, you’ll end up with a stack of veneer smooth and flat on one side, rough on the other. that’s the basic source material for the next step — attaching it. if you’ve skipped the cutting-at-home step, you might have just arrived here with commercial veneer. that’s ok. just remember commercial veneer is already smooth on both sides so you won’t have to smooth it later, just prepare it for finish. otherwise all the same procedure except the “flat” and “smooth” doesn’t matter — you can adhere it with either face and it’ll work.
at this point, you need something to support the veneer — you can call this a panel or a “substrate”. i’ll call it a panel because substrate sounds very much like a government plot to control a population by putting drugs in the water-supply. you’ll hear it called both (and many other things).
so we need to think about what to use. you can attach veneer to just about anything but there are three typical possible choices in woodworking — solid wood, composite materials and veneer-sheet goods. veneering over solid stock is tempting but, unless you’re an expert and you want to have to deal with the wood-movement issue, i would avoid it. there is no upside to using solid stock for veneering. you’re not going to see it and sheet goods feel like wood. with the veneer attached, they look like wood. and veneered solid-wood looks like veneered plywood so nobody will know the difference. composite materials come in various forms — particleboard, cardboard, melamine, phenolic resin panels, mdf. the most common for veneering is the last — mdf, preferably lightweight mdf. if you’re curious what the difference is between lightweight and regular mdf it’s about half the weight, the species of wood used and the density of the adhesive. it’s not quite as strong. it’s strong enough. use the lightweight stuff if you’re going to go the mdf route — if you’ve ever had to move a full sheet of standard mdf, you’ll understand why.
there’s no reason not to use mdf if you’re ok with mdf in general. i have issues with mdf that have nothing to do with veneering. it’s dusty. really dusty. when you work mdf, you won’t be able to breathe unless you use a respirator. and i don’t mean while you’re cutting it. i mean in the shop for hours after. i have severe asthma. i simply refuse to use mdf in my shop for anything. it’s not worth the pain and suffering. there’s nothing wrong with it as a substance if you can put up with this obvious limitation. my suggestion, though, is, if you value your ability to breathe (i often wonder about this given the general public’s disregard for an infectious disease spreading as a pandemic that destroys your lungs and their willingness to accept that risk but that’s another matter entirely), use plywood.
plywood is the natural choice for veneering. why? because that’s how it’s made. plywood is a stack of veneers layered with alternating perpendicular grain directions. it’s extremely-stable and you can treat it like regular wood. plus it’s not dusty like mdf. yes you’ll get sawdust. but no more than with regular solid-wood. here’s another nice thing about plywood rather than mdf, by the way, if it’s never become an issue for you — if you get mdf damp in any way, it will completely disintegrate and start to grow mold. this is not generally a good selling-factor. my generalized loathing for composite fiber panels is rather extreme. just so you know.
some people will tell you veneering over plywood means you have to continue the pattern of perpendicular grain. while that may be the best practice, it’s not necessary. so you should do it if you can but if you can’t it doesn’t matter. treat it like grainless mdf and it’ll be totally ok.
so we have our panel. now how are we going to get the veneer to stick to it?
there are two ways to get things to stay in place — traditional clamping pressure or hydraulics. the second is generally the one that’s recommended if you’re going to do a bunch of it. it’s far simpler and tends to work very well. you can use a veneer-press (which is about the cost of a small village) or a vacuum-bag (which you can pick up at your local supplier for a couple of hundred dollars — or much more, depending on how large and powerful you want the bag and pump to be) to apply even pressure on a piece, often both faces at once. if you’re going to use that approach, once you get the glue on, don’t just put the piece in the vacuum-bag and apply pressure. it will warp. put a sheet of plywood over the veneered surface(s) then deposit the whole thing in the vacuum-bag and increase the pressure. you’ll get a much flatter result that way.
with clamps, though, the procedure is a lot more involved. not complicated. just more involved. you’ll need clamping-cauls. to veneer a tabletop, for example, you’ll probably need a clamp on each side every 10cm or so pressing down on a thick piece of wood spanning the entire width of the table. this requires a lot of clamps — and a lot of strips of wood —, especially if it’s a big table. a 1x2m table will require, at 10cm-spacing, 42 clamps and 21 cauls. if you can’t picture this, i’d say draw a picture and label the clamps. you’ve probably got it right in your head, though. this is a perfectly-acceptable way of clamping veneer and it will absolutely work. if you have to do this on a regular basis, though, you’ll quickly decide to get a vacuum-bag system to avoid the effort. it may also be cheaper than paying for all those clamps. you really do need a lot of pressure to avoid delamination in the future.
we’ve covered most of it but there’s one more sticky elephant in the room and it’s mostly yellow. what adhesive do you use?
let’s begin with what adhesive you shouldn’t use. contact-cement. just don’t. there are many reasons this is a bad idea and none that make it a good one. it’s hard to work with and it generally fails. don’t believe me? call a commercial cabinet shop that’s been in business for a while. ask them what the biggest problem they have with custom-made kitchen countertops adhered with contact-cement is. i promise it’ll be “they delaminate” — and their contact-cement is far, far more industrial than what you’re getting at walmart. it’s asking for trouble. do it at your own risk. no. on second thought, just don’t do it.
that leaves us with a few other options. you can use urethane glue or epoxy. they’ll definitely work. urethane glue, though, is very messy and comparatively-expensive. epoxy is even more expensive, though significantly less messy. it is, however, generally very slow. that being said, these options will both work. i should probably mention one other possible problem with these two, though, if you’re using a vacuum-bag system. water-based glues like pva will easily peel off the plastic on the inside. urethane glue is much, much more difficult to remove and the bag can be damaged beyond repair. trying to get epoxy off the inside of the bag is an exercise in frustration i wouldn’t recommend to anyone. so you will have great results if you use either of these adhesives. you just might not find the tradeoff worth it.
that leaves us with the obvious choice — wood-glue. as with most things in woodworking, yellow pva is usually the best tool for the job. it’s not the strongest but it’s stronger than you need it to be, easy to use and easy to clean-up. and that becomes more and more important as you get older, i guarantee. i’m not even that old and the fluffy residue from urethane glue drives me beyond crazy every time. it’s not that the glue doesn’t work. it’s that there’s going to be squeezeout and it’s going to be a nightmare. even a little is annoying.
for veneering, you can definitely use titebond 1 or 3. take your pick. i avoid titebond 2 in general, not specifically in veneering applications, because has a history (i’ve experienced it too many times) of color-leeching and visible pigment change. you might not have this problem. if you work only with oak and beech, you probably won’t. if you work with cherry and walnut, you likely already know what i’m talking about. the advantage of titebond 1 is that it dries faster and is cheaper. titebond 3 is water-resistant and gives a stronger bond. both work fine. you can certainly use other brands — check out james wright’s glue tests if you haven’t seen them yet — they’re awesome af. they have nothing to do with veneer but they will tell you a lot about glues. mainly that you can use whichever pva you have easy, inexpensive access to and it’ll be totally fine.
one last thing about the procedure. once you have your veneer attached to the board, this is the best time to surface it. if you’re doing it with powertools, run the panel through the planer and make sure the veneer is <2mm thick. if you’re doing it with handtools, do the same thing with your handplane(s) and the result will be the same. you’re going to have to smooth and sand it after the powered planer, anyway, right? if you’ve used commercial veneer, this should just be a question of light sanding but i suspect you’ve jumped in the deep-end and made the veneer from scratch, too. congrats.
time under pressure
let’s do a relatively-simple veneer project to get you started and dispel any worries about the procedure being impossible. you’ll only need a very basic set of tools for this. to cut the veneer, you need a veneer-saw or a very sharp knife. i like using a veneer-saw and they’re quite cheap. but these pieces are all linear so there’s no need for a fretsaw or any specialized gear for your bench. you can just cut the pieces using a metal ruler as a straight-edge or a paring block. anything that’s at least as long as the cut you’re making.
when you make these cuts, clamp the piece down. don’t assume your weight will keep it from moving. precision is important.
today’s project is a modern square clock. you can certainly make it round if you prefer but that involves all kinds of curves and i don’t think it’s necessary — the square one is quite striking already! you’ll need a cheap quartz movement and you can pick one of those up at a hobbyist’s store or on amazon or wherever you usually get your clock stuff.
this is what it should look like when we’re done…
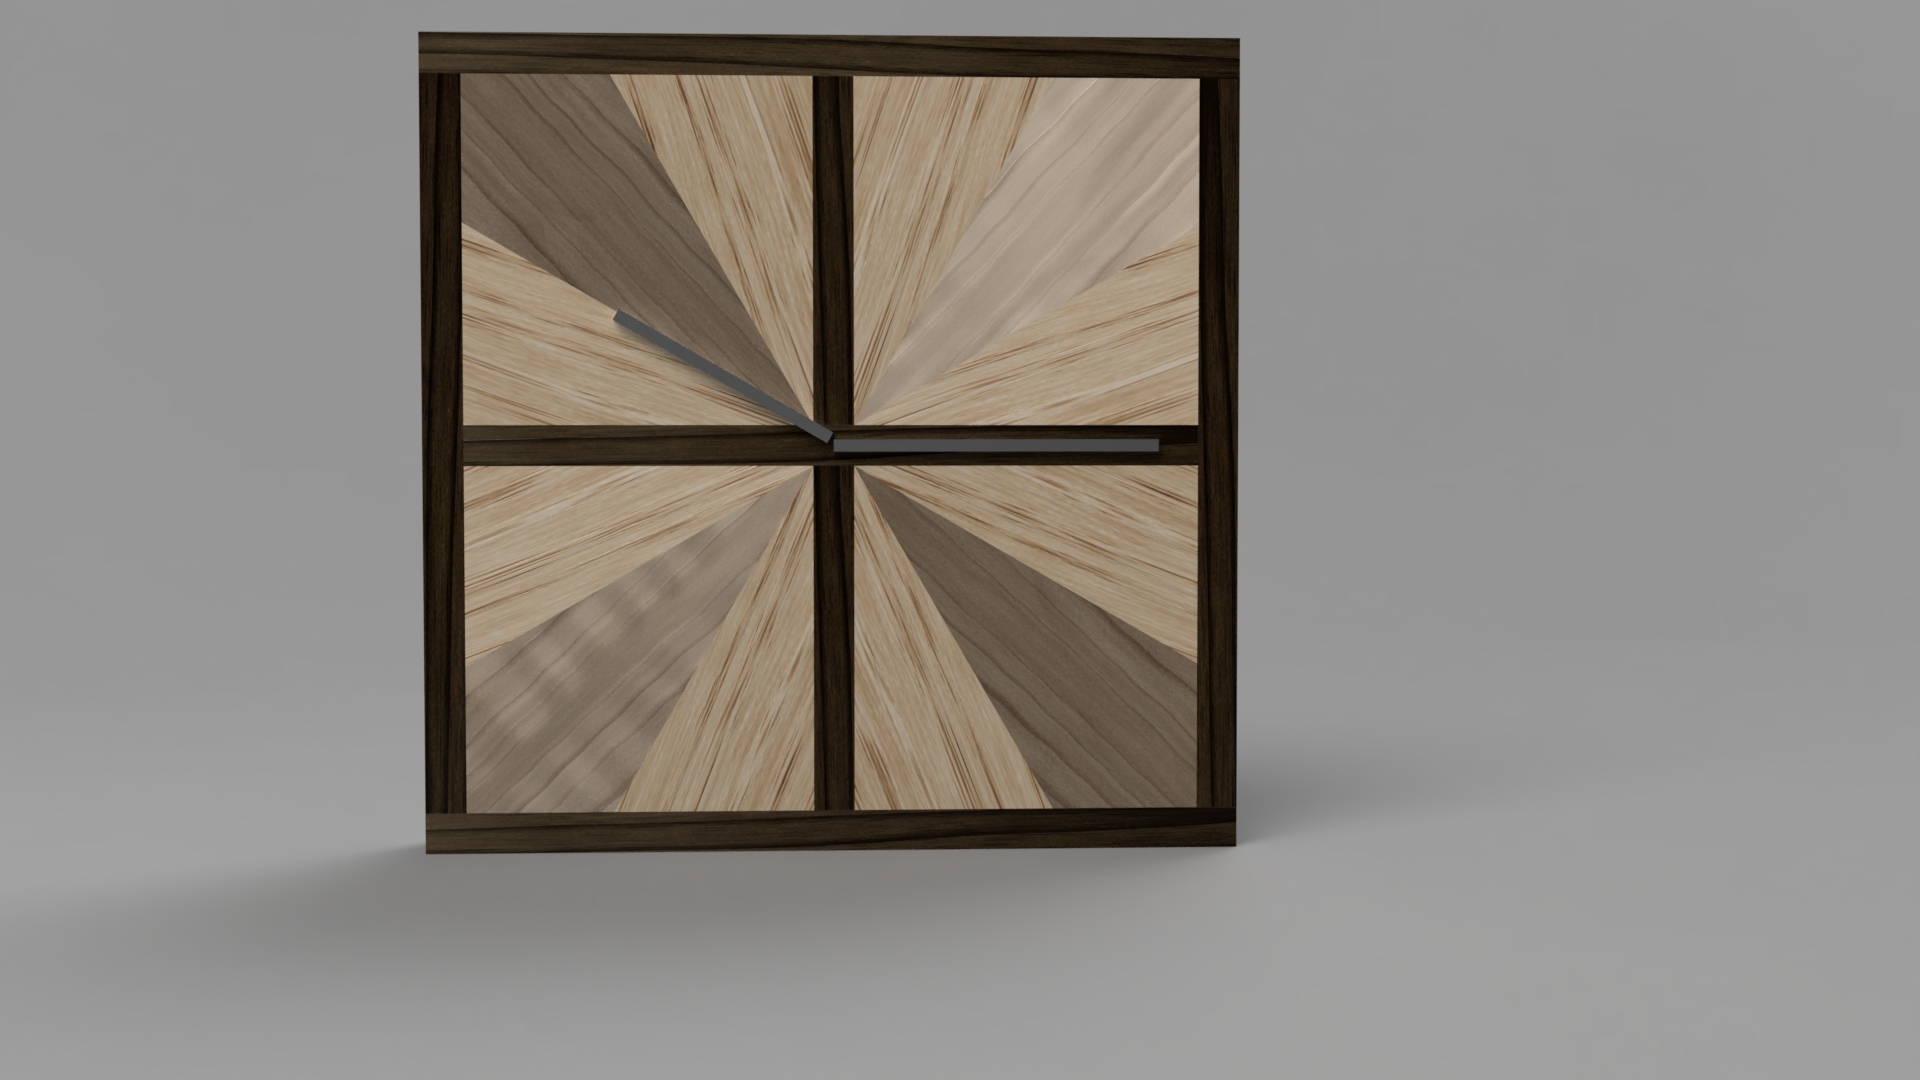
as you can see, this is a sunburst-pattern veneer with some decorative dark pieces. you’ll need two different types of veneer to make this work — or a little ingenuity with some ink, which is what i did the first time i made this. the clock is 400mm square. so what you need is a board 400x400mm. i suggest 19/20mm plywood. use whatever tools you like to get a square. if you use good-quality plywood, you’re more likely to get it to be flat. high-quality plywood in most of the west is often referred to as “baltic-birch”, though it may go by another name in your area. that stuff works well. a very small piece shouldn’t cost much wherever you get it. you might already have a large-enough offcut in your shop.
now comes the fun part. we need to cover five faces in veneer. no, you don’t need to cover the back. why? because we’re using plywood and it’s already covered on the back. you need to finish it but veneering the back is only necessary if there’s going to be a difference in moisture-absorption-levels. and that isn’t really an issue on a small panel that’s already made from veneers. we need seven small trim pieces for the front, four edge pieces and twelve circle segments to put the clock together.
the edge pieces are the easiest to cut so let’s start with those. they’ll be the thickness of your panel wide (likely 19mm) by 400mm. they’ll all be the same. every panel should be cut too large and trimmed later, other than the inside-frame components. aim for approximately 24×410 on these. place your straight-edge on the grain of your veneer, slice with your veneer-saw or knife repeatedly until it separates cleanly. then repeat until you have four surfaces the right size.
the outside and inside frame pieces are the next ones we’ll cut. the top and bottom frame pieces are 10x400mm. the side pieces are 10x380mm (missing the 10mm on top and bottom). the center division pieces are a little smaller. the horizontal piece is 10x380mm) just like the sides. the upper and lower vertical pieces are 10x185mm. they’re all rectilinear so they can all be cut with a single straight-edge.
for the radial pieces, you have two choices. you can either cut a block of wood with a 30-degree angle on one end to use as a template or you can cut them all using an angled straight-edge. either is fine. each piece has a 30-degree angle and the other end will be trimmed to fit later. what i would suggest is cutting them all at 60x150mm and trimming them once they’re on the panel using your straight-edge.
align the 30-degree point so it is directly inline with the grain of your veneer and draw the two outside lines 150mm long then connect their ends and you have a 30-degree wedge. make twelve of these.
you now have all the pieces. from here, it’s just a matter of attaching them in a sensible pattern and trimming them to fit. start with the outside edges. glue those on and clamp them in place. they shouldn’t take long to dry. once dry, remove the clamps and use a chisel or plane to flush the edges with the panel. you’re already getting the hang of this veneering thing.
a note about gluing to plywood endgrain. it’s a good idea to size the endgrain first. this is not a structural joint. it’s just veneer so there’s no pressure to withstand. still, apply the pva to the sides of the panel and let it dry then sand flush. now adhere your edge-banding and all will be good with the world. instead of gluing to the endgrain, you’re gluing mostly to the glue. it’s a much easier bond to make work.
now stick your center dividers on. be careful about measurement. you will probably want to hold each one in place until the glue starts to set. double-check they’re centered. once they’re dry, you won’t be able to move them and they’ll look odd if there’s any variation. the human eye is an amazing tool for finding the middle of a square. these can be quickly clamped in place and it’s just a matter of waiting for them to dry.
people will tell you a lot about taping pieces in place. you’re welcome to do it for the radial pieces if you like. i’d use masking-tape or veneer-tape. don’t use painter’s-tape because it’s simply too strong and can damage the veneer if you have to pull hard to get it off. if you use a vacuum-bag, it’ll make it particularly difficult and might leave an indentation in the veneer, too.
the important part, though, is that you align the points. each piece has a precise 30-degree angle – you triple-checked this when you were cutting, right? either with the template or your angle-guide. given that each edge is exactly 90-degrees, three of them should fit exactly. they will significantly overhang the edge but that’s ok. we’re going to solve that problem right now. stick all twelve pieces in place. now lay your edge pieces where they will go and make a mark where they intersect. you could have cut these exactly the right size before but it’s far easier to do it accurately with the pieces you’ve actually made. the important part is to get four straight edges. exactly 10mm of edge isn’t significant. it just has to be straight. and cutting these pieces independently, hoping they will come out straight when assembled is a lot more difficult than just cutting them too big and trimming them later. you can hold them down with double-stick tape while you mark them or you can tape them in place. it doesn’t matter which you choose. just make sure they’re firmly in place and draw your lines. then take the whole thing apart and trim the pieces. then glue them and clamp them in place. i’d suggest using the clamping cauls we discussed earlier to make sure there’s pressure across the whole face.
the last step is to put on the face’s four outside-edge pieces these should be easy at this point and won’t even need cauls because the clamps can be put along their entire lengths. you can use cauls if you are low on clamps. stick those in place. when they’re dry, trim the overhang.
if you’ve been using shop-made veneers, this is the point where you will need to seriously smooth the whole thing. if you’re using commercial ones, you can skip to finish-sanding. the piece is now done and ready for finish.
apply the finish of your choice. i’d recommend six to ten coats of thin clear-dewaxed-shellac.
whether you’ve made the clock with me today or just discovered a little more about veneering and put the decorative timepiece on your todo list, i hope you’ve become a little more confident about using veneer in your usual work. it’s a great skill to develop and incredibly useful for building furniture, though we often neglect it as traditional woodworkers. thanks for taking the time to explore the topic with me!