(click here to download the detailed 3d diagrams with measurements.)
one of the most common things i’m asked to demonstrate is traditional japanese joinery – realistically, though, while i certainly prefer japanese methods, the joints are often more complex than are needed in contemporary furniture and the traditional mortise-and-tenon and dovetail used in the west are actually the most common in japanese furniture construction, too. the more-obviously-asian joints are relatively rare in practical applications but they can be beautiful and extremely strong. perhaps the most visibly-appealing of these joints is one that’s more often faked than cut as a functional joint – the kane tsugi. without getting into all the specifics of translation, though, the easiest way to think of this joint is as a pinned-mitered-bridal-joint. if you’re curious why it’s called a “bridal-joint”, it has male and female sides and i’ll leave the rest to your imagination. it results in strong picture-frame joints that never shift and the visual interest makes it obvious this is a handmade frame – no mass-produced machine process is going to go to all this trouble!
that being said, it’s a time-consuming joint to cut but nothing particualrly difficult. if you can draw some lines and use a chisel to carefully pare to them, this should be no problem. you’ll need a small backsaw, a couple of chisels, a hammer (or mallet) to hit the chisels, a straight-edge paring block, a pencil (of course) and, perhaps, a drill (electric or hand-powered makes no difference as long as you can drill straight with it) – you can definitely cut the hole with a chisel but i’d personally avoid that because it significantly increases the difficulty of the whole project and the result is the same.
the first thing to do is to prepare your stock. i am building this (as you can see from the pictures) from cherry with walnut pegs but you can use any wood you like. cherry (sakura) is one of the most traditional woods in japan and it’s one of my favorites to work with. i’m using walnut pegs simply because they provide visual contrast but you can use the same species for those if you prefer – i’ve also done this with brass or aluminum pegs for a more industrial look.
first, square your stock at 80x18mm then cut to length. i suggest leaving yourself a little extra when you cut but the lengths you’re aiming for in the finished piece are 400mm rails and 560mm stiles. if you cut them to 420 and 580, you should have plenty of extra material to pare away and guarantee perfect 45-degree miters.
while you’re preparing stock, the other things you’ll need are four pins. these will be 12mm squares and i suggest making them at least 40mm long to make them easy to insert later. don’t prepare your back or glass until you’ve finished all the joinery unless you’re exceptionally confident in your precision. it’s far easier to fit a back once you’ve got the rest already in-place.
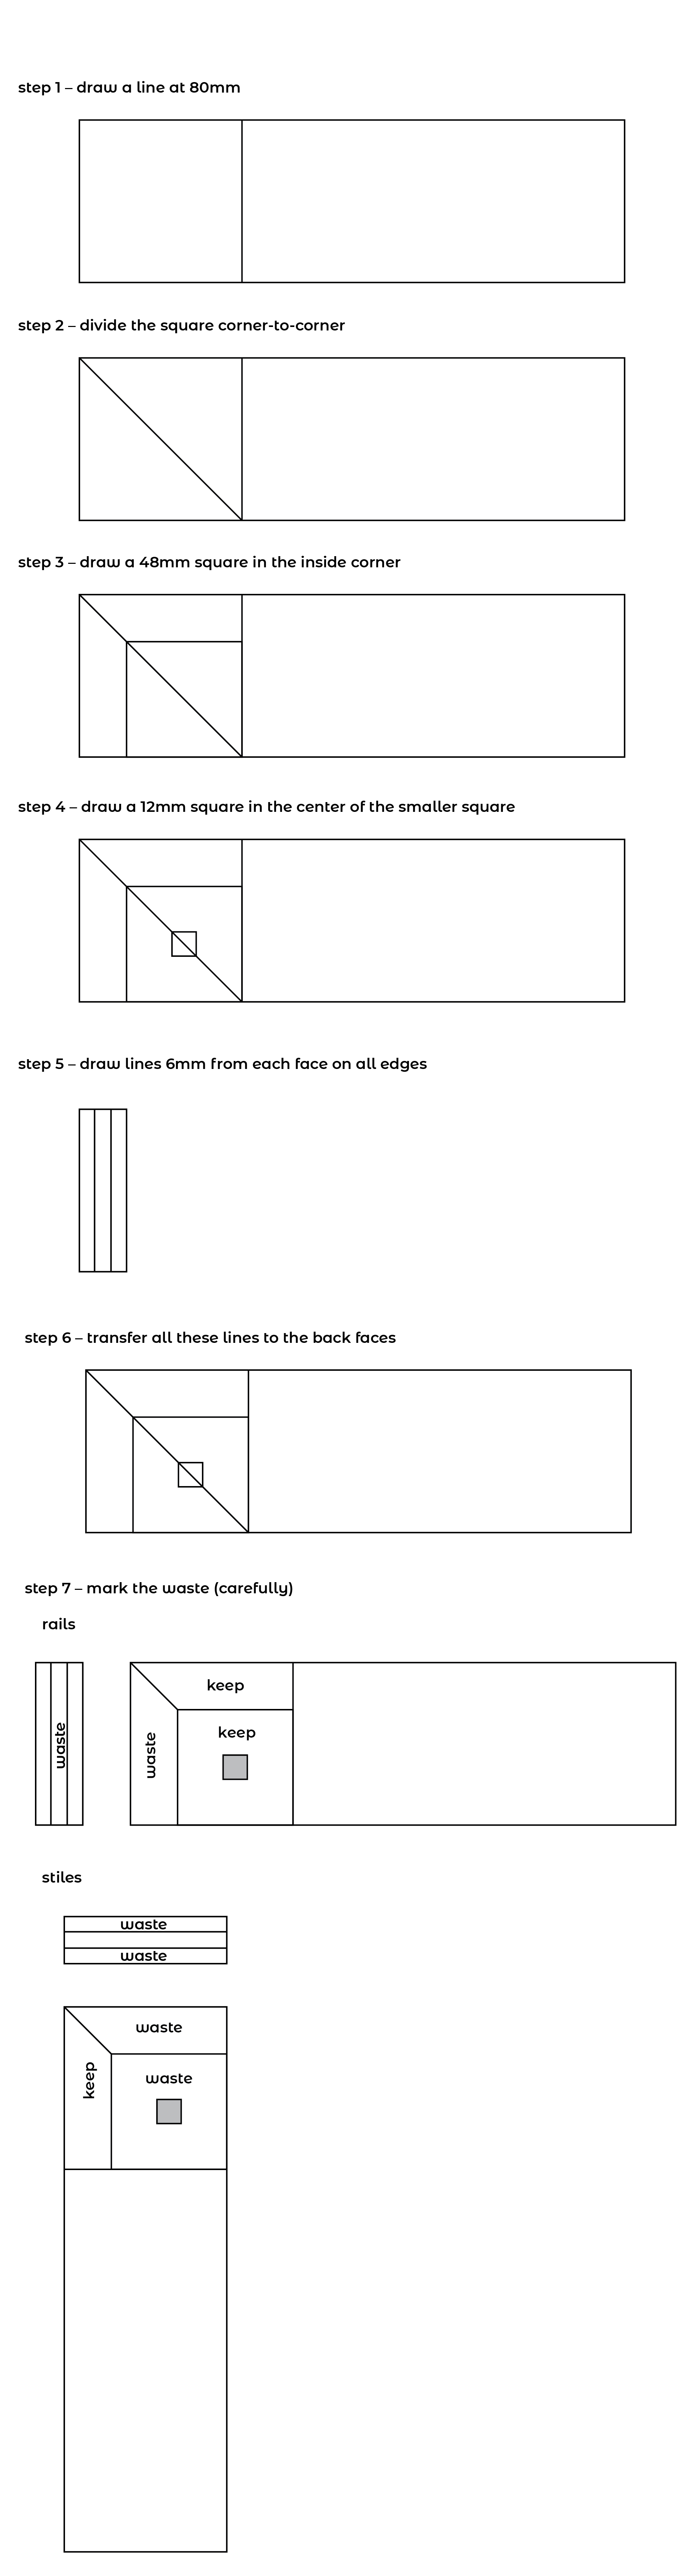
we’ll cut the rails first. either is fine but i find it easier to cut a mortise then shape the tenon to fit. a bit of layout. lay your stile across your rail flush against the end and draw a line where they intersect. this line should be 80mm from the end. repeat this on all four ends of your rails. if it’s not 80mm (check with your ruler), figure out why it’s not. precision is important and, while you can definitely do things with different measurements, the first time is far easier if everything is precisely as expected. this isn’t a simple 45-degree miter-joint and it’s easy to get lost if things get a little different. do the same with your stiles using a rail to draw your lines. the drawings on the faces and edges should be the same on both rails and stiles. don’t forget to label them “left”, “right”, “top” and “bottom” on the front face of each. it is easy to get confused – i’ve definitely had it happen.
you should now have an 80mm square on the end of each rail. draw a diagonal from the outside point to the inside point of each square.
from the inside point of that square, draw a 48mm square then a 12mm square in the center of that square (18mm from each face).
turn the boards and draw lines 6mm from both faces on the outside edges. these are the guidelines for your mortises and tenons.
mark your waste. if you’re not sure what’s going to be waste, take a look at the diagrams both in 2d and 3d. the idea is that we’re going to be cutting a miter on the outside corner and a mortise in the rails to accept a tenon on each end of each stile. don’t worry about the rabbets for the back and glass yet. we’ll cut those once the rest of the frame is already assembled.
the first thing to cut shouldn’t be your miters. cut the straight edges first. on the rails, this will be a 48mm-deep cut 32mm from each end. don’t aim for your line. give yourself at least 1mm to pare to – much more if you’re not precise with your saw. when you have those done on each end, complete the squares and you should have a 48x32mm rectangle cut from each rail. repeat this on the stiles the same way. the cuts are rotated but the dimensions are all the same.
how to cut the angles is a good question. i think it’s easier to simply skip the saw and go straight to a guide-block and cut them with a chisel. you’re welcome to use a saw if you prefer but don’t get too close to your lines. pare with a chisel for accuracy. start with the rails then move on and do the same for the stiles. with the rectangle already removed, it should be simple to connect the inside point of the missing rectangles with the outside points of the rails and stiles. if it’s worked properly, you’ll have a rectangle and a right-triangle missing from each piece.
now comes the difficult part. cutting the mortises and tenons. yes, you can use a saw for this. i don’t. remember the outside faces need to be accurate but everything else is hidden within the joint so you can be significantly less precise there. just make sure you don’t have gaps on the outside and the rest can be shaved thinner to make the joint easier to fit – the pin will hold it together even if there’s not a complete bond with the glue.
use a thin chisel (3-4mm) to make a mortise in the end of each rail. you’re aiming for 48mm deep but if you go deeper on the inside it’s totally fine – it just has to be at least deep enough to fit the mating piece. dig the entire mortise at the width of your chisel then bring in a larger chisel (32/36mm is my recommendation) to widen it to 6mm.
on the stiles, the process is far easier, which is why we left it until now – it’s easier to make this fit the mortise than to keep going back to try to get the mortise exactly the right size. start about 1mm from your line and chop down with your large chisel along the entire line to create a stop-cut – hold the bevel away from the line. now flip the bevel and angle the chisel at 45-degrees, move it a few millimeters into your tenon and chop out the v. go back to the first line you made and go deeper, repeating the same thing. do this for the entire tenon. all your cuts should be across the grain. if they’re not, you’re doing it wrong and the piece will split. be careful.
if your joint fits, that’s fantastic. if it doesn’t, you can continue to pare your tenon using a chisel or use sandpaper to make sure it’s smooth there and inside your mortise. when they’re all exactly 6mm-thick, the joint should slide together with light pressure from a mallet or clamp. glue it together. yes, i’m aware we haven’t made the holes for the pins yet. apply clamping pressure left-to-right, top-to-bottom and, most-importantly, front-to-back on the joints. check for square. if it’s not square, force it to be. you won’t hurt it. it’ll thank you later.
once all four joints are seating properly, take out your drill and drill the four holes straight through the completed joints at 8-10mm. don’t drill at 12mm unless you want larger holes. use your 3 or 6mm chisel to make these holes square through each joint. with those holes made, put glue in the holes and drive your pegs through. you can leave the pegs proud, round them or cut them flush. i like to cut them flush for a more contemporary look. totally up to you.
you don’t need to use clamps for that. once it’s all dry and your pegs are trimmed, you can cut your rabbets. use a straight-edge and saw to make 6mm-deep rabbets 6mm from each inside edge on the back. i’ll say that again – on the back. i’ve made this mistake before. i will never make it again, i hope. if you do, it just means you’re switching which face is the front but you’ve probably picked the nicest faces for the front and it’s disappointing if you have to switch now. there are many ways to cut a rabbet – you can even use a trim-router if you like. i do it with a saw and finish the inside corners with a large chisel. yes, it’s easier to cut them before you glue the piece together. but they never line up perfectly and cutting them after ensures no gaps. take your pick. i do it after.
sand. thoroughly. at least to 400 but this is a display of your woodworking prowess. i’d go to at least 1000/1200 and make the thing shine. apply finish (i suggest 6-10 coats of thin shellac) and let it dry.
cut your back and glass to the size of your opening, seat them and pin them in place.
now you have a picture-frame. i hope you’ve enjoyed building with me today. this is a very functional joint, extremely stable and secure, though not the simplest to cut. perhaps you’ll find other uses for it in your daily woodworking. where it typically shows up is in frame-and-panel construction – perhaps make a desktop or doors using this as a way to accent your edges. thanks for taking the time to explore japanese joinery with me. until next time…